Sunday, 18 January 2015

Poor little neglected blog...

Ok so I really really suck at keeping this blog updated (As shown by my 2 year hiatus!). I thought I'd do a couple of posts just showing some of the cakes I've completed over the past couple of years.

Spiderman Cake

The following cake is one I made for a friend of a friend. Her son was turning 6 and was obsessed with Spiderman. I used the Best Recipes chocolate mud cake with a basic chocolate ganache. The kids at the party all loved the cake and apparently fought over getting to eat the spiders :)


Jaws Cake

The following cake was also for a friend of a friend. Her son was obsessed with Jaws although he wasn't allowed to watch it lol. I was really happy with how the shark head turned out, although I didn't think the rest of the cake was quite up to the standard I was hoping to achieve. The cake was my easy peasy 5 minute chocolate cake with a chocolate ganache.


Chocolate-Espresso Layer Cake

The following cake is a birthday cake I made for my father in-law. I decided to try a non-fondant cake, and used inspiration from this gorgeous vanilla bean latte cake from Sweetapolita. I used my easy peasy 5 minute chocolate cake but tried my hand at making my first Swiss Meringue Buttercream - espresso flavoured. I also made candied pecans, some of which I left larger for decoration, the rest I blended into a crunchy topping and added to each layer. This cake was by far my favorite cake yet, it tasted sooo good, and the candied pecans were amazing!


Lego Power-Miners Cake

For A's 4th birthday he requested a Lego Power Miners cake. In case you've never seen Lego Power Miners before (you can see a couple of examples of them on the cake below), they're incredibly complex and intricate and I had no idea how on earth to make one out of cake! So in the end I cheated and decided to make a mine out of cake and add the Power Miners onto it. Everything on the cake was edible EXCEPT the Power Miners :)
I used my normal chocolate cake recipe and made a caramel Swiss Meringue Buttercream.


Minecraft TNT Cake

For A's 5th birthday this year he requested a Minecraft cake. He loves playing Minecraft and blowing everything up with blocks of TNT so I thought I'd do a block of TNT for his cake. I used a terrific banana cake recipe layered with cream cheese frosting and covered in white chocolate ganache.

(Apologies for the crappy camera phone pics!)


60th Anniversary Cake

The last cake I made was for my husbands grandparents 60th wedding anniversary. I wanted to try my hand at brush embroidery for the first time. I don't have very steady hands at piping, but I was still happy with how the cake turned out. I used the Exclusively Foods white chocolate mud cake with raspberry swiss meringue buttercream and covered in white chocolate ganache.


Monday, 8 July 2013

Catching Up...

Ok so I've been a bit neglectful over the past few weeks. I actually completed my very first order for a complete stranger 2 weeks ago, the customer ordered a chocolate mudcake Spiderman themed cake for her sons 6th birthday. This is what I came up with:


This little spider hanging on for dear life was definitely my favorite lol!!


I haven't done a lot of piping in the past, the very first attempt I had made at piping was for the snowflakes on the Christmas cake:


I was definitely much better at it this time around, I think I had the icing consistency off when I was making the snowflakes. I also used a different recipe for the royal icing, rather than using Sweetopia's recipe as I did the first time around, I found this highly rated recipe on allrecipes.com which worked much better for me.
So the feedback I received for the Spiderman cake was really good, the customer was so excited when she saw it, and her son was really happy with it too, she sent me back an e-mail a week later:

"I would like to thank you for an amazing cake, Riley and the children loved it ( only problem they all wanted a spider :) ) The mud cake was amazing never had one quiet like that one . I’m sure you will get a few orders from my friends!"

So I had finished the cake the day before it was to be delivered and good thing too because I started feeling unwell the next morning and by that afternoon I had developed a full on flu!! My husband delivered the cake for me while I took some cold and flu tablets and crawled into bed.

Unfortunately the cold and flu tablets I was given by the doctor (I can't take regular cold and flu tablets at the moment as I'm currently still nursing) really messed with my head and I was having trouble judging distances and kept bumping into things all day. Later that night when I had Baby Z asleep in my arms I went to sit on a chair, misjudged where the chair was, clipped the edge of the chair with my right hip and fell heavily on my left hip.

Since I was holding Baby Z I wasn't able to put out my hand to break my fall like people normally would, and I fell in such an odd angle and fell so heavily. The pain was excruciating!! My husband and FIL helped me to lie down on the ground because I was starting to black out from the pain.

I laid there for about half an hour while we waited to see if the pain would recede, but it was just getting worse and my left leg was starting to tingle and go numb, there was an excruciating sharp pain just to the left of my groin that wasn't receding. Eventually we decided I must have done some serious damage (actually, I kept insisting on it from the beginning - I just had to convince my husband that it was serious!) and since I couldn't move my legs at all, couldn't sit up without excruciating pain we decided we had to call an ambulance to take me in to the hospital.

So the ambulance arrived, and my wonderful paramedics, Steve and Matt dosed me up on morphine and some other awesome drug in a green whistle thing (seriously, that stuff messed me up! haha), then got me loaded into the ambulance and followed my husband back to the hospital (We live sorta out in the sticks! They had enough trouble finding the place and thought it would be easier to simply follow my husband back in haha!).

So once I got admitted into the ER and was assigned our wonderful nurse, Jacob (who just happened to be the same male nurse we were assigned when we went to the ER a few months ago for my husbands asthma attack), and was given more morphine, they took some x-rays and announced that I had fractured my pelvis. Awesome.

So now I am stuck on bed rest for the next 4-6 weeks (6-8 weeks healing time all up), can only get around on crutches, and am in a large amount of pain and discomfort. Lovely.

Coincidentally, my mother actually fractured her pelvis when she was 7 months pregnant with me. Not only that, but she actually fractured her pelvis in the exact same place as I've fractured mine! At least they kept her in hospital for 2 weeks before sending her home, I was discharged the very next day!

The nurses at the hospital told me that it's actually quite surprising that I managed to fracture my pelvis simply by falling off a chair, normally that type of injury they only see in car accident victims!! Of all people to manage this sort of injury, it just had to be me...

Tuesday, 11 June 2013

My very first cake order!!

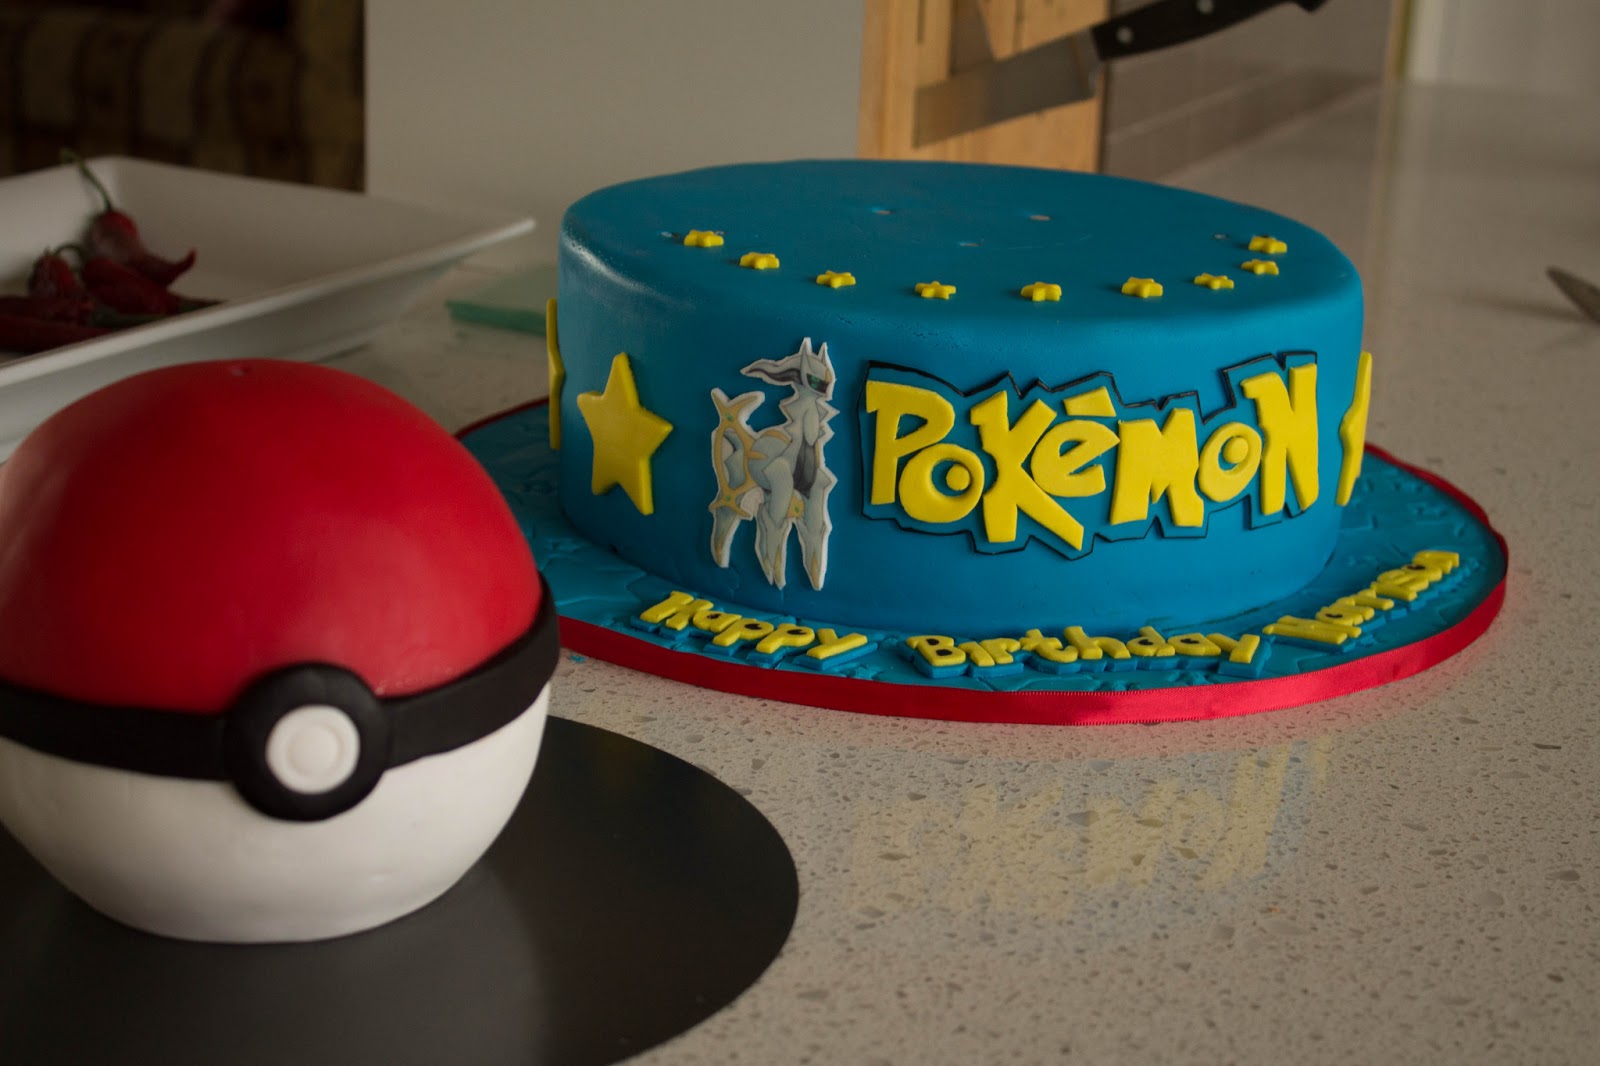
So one of my friends asked me to make a cake for her sons 9th birthday (yeah yeah I know it's not a real 'order' if it's coming from a friend - but I'm ignoring that fact lol!!). Apparently he's obsessed with Pokemon so naturally the cake was a Pokemon themed cake. His favorite character is Arceus, but after looking at how detailed Arceus is I decided to make life easier on myself by ordering an edible image to put on the side of the cake.

 The Pokeball was surprisingly easy to make. I ordered the Fat Daddio's 5" hemisphere pan. I was a little apprehensive about using it, when I looked online there were a lot of mixed reviews about it being difficult to use and the cake not cooking properly etc.
I took all the reviews on board and this is how I made the ball: First I used my chocolate cake recipe as a tester. I sprayed the pan well with cooking spray then used my silicone pastry brush to make sure the entire pan was evenly covered, then I also floured the pan. The pan has a rounded bottom which a lot of people had a lot of trouble with - I just sat the pan inside one of my oven-safe ramekins and had no problems!
The chocolate cake recipe says to bake at 175 for about 35 minutes, instead I reduced the temperature to 160C and baked for about 50 minutes. I also placed a pan of water in the bottom of the oven.
I found I needed to fill the pan nearly to the top - there was probably only about 1cm gap between the batter and the top of the pan but the cake didn't overflow, it rose just above the edge of the pan and was perfect for leveling once it had cooled.
I found it easiest to put the two halves together, ganache the entire ball and then cover each half in fondant seperately (I cut a small bit off the bottom of the ball so it had a flat base to sit on). I covered the white side first by placing the ganached ball upside down in a bowl and cutting off the fondant at the half way mark (that was easy enough to measure out since I knew the ball was 5" tall). I then cut a circle out where the cardboard base was on the ball (yes, initially I covered the cardboard base up - I found this worked easiest!). I then turned back the right way around and did the same with the red fondant. The seam where the two fondants met was covered by the black ribbon.


I did the Pokemon logo by printing it out on my computer, cutting each letter out and sticking to my fondant with shortening, then tracing out with my Xacto knife. I used the same technique for the Happy Birthday message on the bottom and the lightning bolts.

For the lightning bolts I used 22guage floral wire so that they looked like they were shooting out from the cake. I let the lightning bolts dry for a couple of days before I heated up the wires and inserted them into the lightning bolts.

I used a dowel+cardboard base support system so the weight of the Pokeball wouldnt squash the cake and covered a masonite cake board in fondant for the first time.

I was extremely happy with how this cake turned out and looking forward to a couple more orders I've received as a result!!

Monday, 3 June 2013

Baby Z's 1st Birthday Cake


So I thought I'd do a little post on the cake I made for Baby Z's birthday party. At first I was contemplating doing another fondant covered cake, maybe a ruffle cake like this:

Beautiful ruffle cake by It's A Cake Thing
But then I decided I wanted to make a smash cake to go along with the main birthday cake. I'm sure you've all seen the adorable photos of babies with their own little smash cakes, well I wanted to join the craze, BUT I had this crazy idea in my head of incorporating the smash cake into the main cake as the top tier. I hadn't really seen this before, most smash cakes I've seen are separate cakes next to the main cake.

Well this complicated the logistics for making the cake somewhat. In order to create the best effect and 'photo op', smash cakes should be covered just in buttercream, not fondant. If I was going to use the smash cake as the top tier then the entire cake really needed to be buttercream, otherwise it wouldn't look right (well, I couldn't think of two designs I wanted to do that would work together, there are a lot of other people out there who have successfully incorporated the two styles though!). Then I decided that I needed more practice doing buttercream covered cakes anyway and this would be a perfect opportunity.

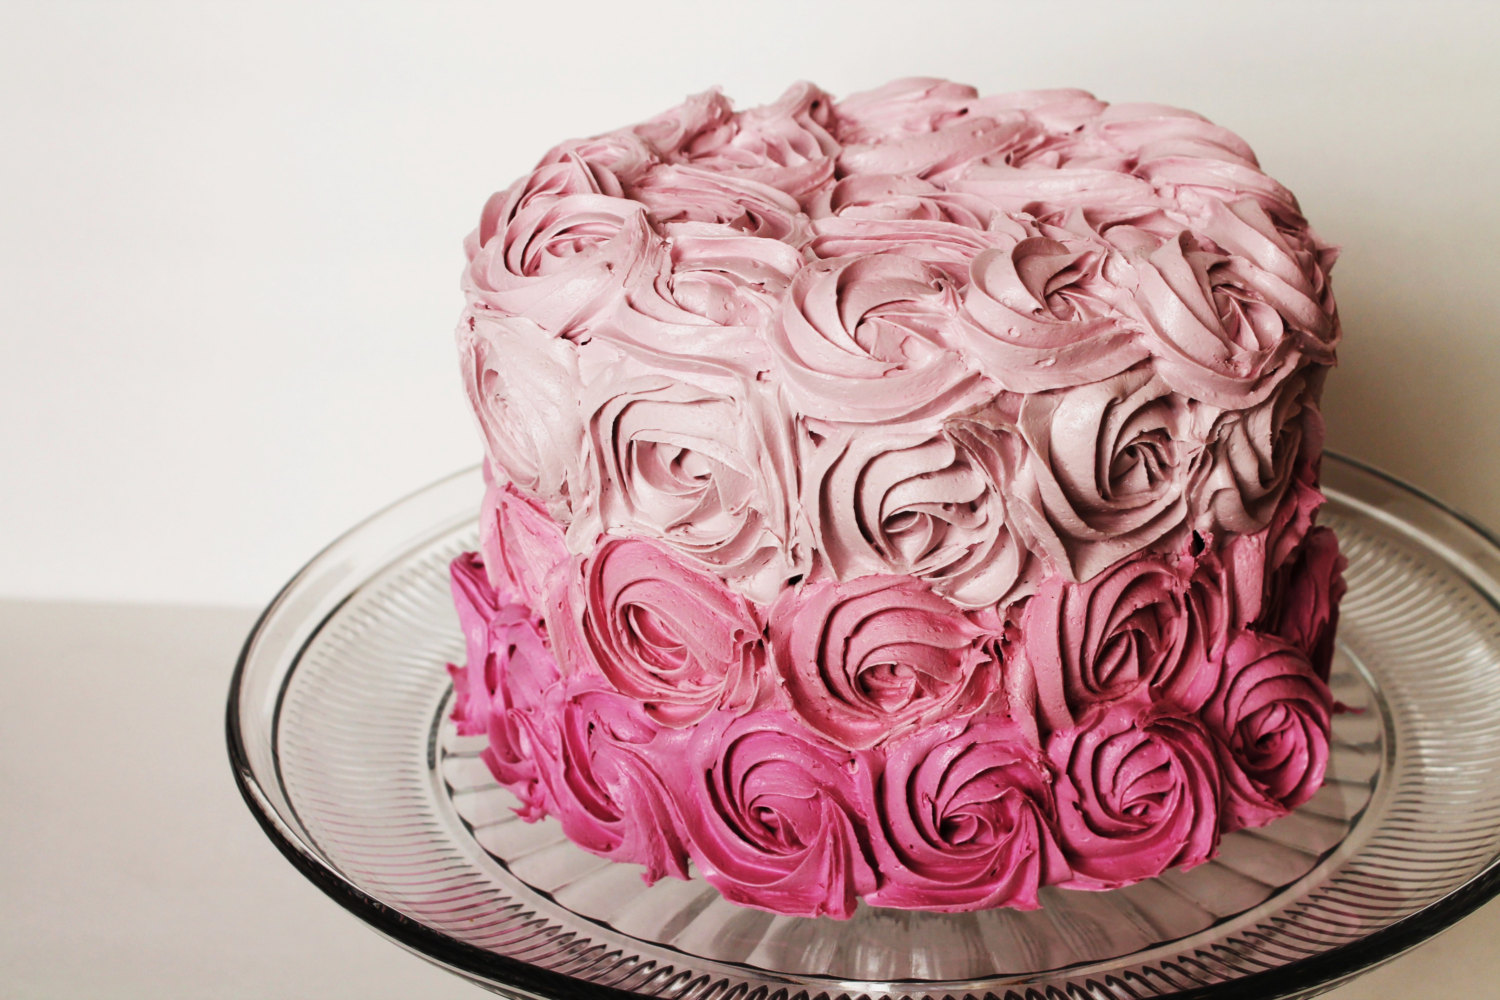
So then I was looking at these gorgeous rosette cakes:

This gorgeous Rosette cake is actually a fake cake for sale on Etsy!! Isn't that bizarre?! Lol

BUT then I didn't like any of the two tier examples I saw AND couldn't get other the fact that it looked much prettier in pink :(
So then I came across this beautiful pastel swirl cake from one of my bloggy idols, Sweetapolita, and fell in love...

Aww isn't it so sweet??!
I also used my fail-safe eggless chocolate cake for no reason other than the fact that I was craving chocolate and thought it would look pretty layered with the buttercream once smashed all over the floor hehe.

So there you have it, Baby Z's 1st Birthday cake:


Tuesday, 28 May 2013

Baby Z's 1st Birthday Party

Ok so I know that I said I was going to post up some tutorials for the decorations I was making for Baby Z's birthday party but what else can I say other than I suck?? I've been incredibly busy over the past month with catching up on studying, family stuff, being unwell, etc so I haven't really had time to do a whole bunch of tutorial posts. Fortunately all the decorations were very easy and straightforward so I'll simply explain each of the decorations.

For Baby Z's birthday I wasn't planning on a huge party with lots of invited guests etc. We don't really know too many people here in Canberra, other than family, and I definitely don't know anyone with kids Z's age so I decided to simply hold an intimate family luncheon and invite over a few close family members.


This is the birthday cake I made using Sweetapolita's pastel swirl method - I probably could have swirled the sides a bit more to achieve a nicer finish, but was running short on time! The top tier I made so it could be lifted off the main cake and used as a smash cake. I used my eggless chocolate cake recipe with pre-made Wilton buttercream - which I DEFINITELY won't be using again!!! It was super sickly sweet, ugh, but definitely easy! I wasn't happy with how the plaques turned out, I was trying out a method that didn't work too well, next time I would probably pipe directly onto the plaques rather than using my edible ink markers.
 

I made this adorable mini cake bunting using double sided scrapbooking paper, string and mini bamboo skewers I found in the local dollar store. I also made the mini pinwheels using double sided scrapbooking paper, and used a sewed on bead to close the centre.


Using double sided scrapbooking paper I made these pinwheels, with silver star shaped pins in the centre. I hot-glued them onto dowels (which means they don't turn like normal pinwheels - but I didn't need them to be functional!) and used these cute glass soda bottles I found at a local dollar store for $1.50 each. I tied a pretty ribbon bow around each bottle.


You can't see his jumpsuit too well in this photo unfortunately, I ordered it online from Cheekee Monkeez. It says Z is for Zavien. A had a matching long sleeve shirt that says A is for Alakai. I'll try to get better photos when they come out of the wash - if the cake washes out lol!!


Stand of half eaten buttermilk scones. I used a flower cutter to cut them out since I couldn't find my round cutters, they looked super cute! They were served with strawberry jam and whipped cream. Yum!!


 I found instructions online for folding napkins into the shapes of button-up t-shirts. The instructions are for cloth napkins but worked perfectly for these paper napkins I bought. I topped each napkin off with one of the tissue paper pom poms I made earlier.

I strung up some of the nicer photos of Baby Z all the way from when I was still pregnant to now. Everyone really liked looking through these photos and I gave each of the grandparents and great-grandparents an envelope with their own copies of the photos to take home.

The smash cake was a definite success! The grandparents were all a little bit horrified at first lol but were definitely amused watching Baby Z's disgust at having dirty hands!! (He doesn't like having dirty hands and kept stopping to try and shake off the icing!)

The menu:
Cucumber and herbed cream cheese tea sandwiches
Red pepper, basil pesto and feta tea sandwiches
Smoked salmon tea sandwiches
Pumpkin and winter vegetable soup with crusty bread
Crispy noodle salad with Asian vinaigrette dressing
Scones with jam and whipped cream
Birthday cake!!

A few of the guests had special dietary requirements so I kept food fairly simple and stuck to vegetarian options. Since there weren't many people and we were all close family I decided not to go overboard with a lot of different options.
I served the soup in individual coffee cup portions, everyone commented on what a good idea it was as it gave you a perfect amount, not enough to fill you up so you can't gorge on scones and sandwiches and cake, but enough to make everything into a substantial lunch.
The sandwiches were gobbled up very quickly, everyone really enjoyed them! The smoked salmon ones were kept very simple, just salmon on bread, no butter or anything else as they were for a couple of the grandparents who have very strict dietary requirements. I'll have to post the recipe for the herbed cream cheese, it was soooo good!!

It was a lovely day spent with close friends and family, and I'm now starting the planning process for A's 4th birthday - only 5 months away!!! Lol!

Monday, 27 May 2013

C.A.M - Mud Cake Scratch-Off - And the winner is....

So for the final test in this months scratch-off I invited over a few friends to help me sample each of the cakes and judge them each based on the flavor, moistness, and density.
I cut a portion of each cake into small 1.5cm pieces and set them out on the table, and labelled each one from A-E. Each person was given a piece of paper and pen to write down their thoughts on each cake, and a cup of tea or coffee to enjoy.

Bluehue's Chocolate Mud Cake:
Everyone agreed that this cake was very very rich. It also seemed to have an odd, nearly floury underlying flavor/aftertaste. It's a flavor that I've come across quite often in chocolate cakes, most people don't seem to mind, or even notice it, but DH and I have always being able to pick up on it and don't tend to enjoy cakes that have that flavor. It's a shame because I really, really wanted to like this cake, I'd heard so many wonderful things about Bluehue's mud cake but it just really wasn't enjoyable to me. It had a wonderful texture and density to it though and the coconut milk added a very unique richness to the cake. You couldn't pick up a coconut flavor until you were told that it contained coconut milk.

Pam's Chocolate Mud Cake:
This cake was very similar to Bluehue's mud cake, although without that extra richness added from the coconut milk. We could also detect that floury flavor/aftertaste that we detected in Bluehue's mud cake, which instantly turned off DH and I. It was still very rich however, and had a lovely texture and density to it. In fact, we had sorta cheated and prior to doing the proper tasting had cut some small slices out of each cake to test before our friends came over. My MIL and FIL when tasting the cakes the first time around both chose this cake as their favorite - although DH and I both disliked it due to the floury flavor/aftertaste. However, when we did the second blind tasting they both disliked this cake and my FIL even picked up on the same floury flavor/aftertaste that DH and I could detect.

Australian Womens Weekly Mississippi Mud Cake:
This was one of our favorites of all the cakes. It was sooo yummy BUT very very very rich!! We all agreed that this cake would be fantastic as a slice or brownie but was simply too rich for a cake - especially if used for a 4 layer cake with chocolate ganache and fondant!! We all kept going back for more, but could only eat a very very small piece at a time. It was a very dense, smooth cake, almost like dark chocolate fudge. It's certainly a recipe I would keep and make again, but as I explained to my taste testers I want to make cakes that taste delicious but aren't so rich that no one can ever finish their slice. I dislike being given slices of cakes that are so rich that I can only ever eat a couple of bites before being done.

Exclusively Foods Chocolate Mud Cake:
I'm not sure what went wrong with this cake. Remember when I made this cake that I felt as though something was off with the batter and the final product? The cake didn't look or feel the same as the others and the batter felt a different consistency. Well when we cut into this cake we found that oddly, rather than having the same fudge-like density of the other mud cakes, this cake was actually fluffy inside and nearly like a regular old chocolate sponge cake. It was nice in its own way, but certainly didn't resemble a mud cake! I used this recipe for my March cake and it turned out fine, however I had used the original quantities, whereas for the scratch-off I used their pan size ingredient chart to make a smaller 6" cake. I'm not sure if the error was in their calculations or if I made a mistake when making the cake. Either way, the final product wasn't really valid for testing, so we chose not to include this when comparing the different cakes as we didn't feel it truly represented an Exclusively Foods mud cake.

Best Recipe's Chocolate Mud Cake:
This cake had a lovely chocolatey flavor without the super-richness that the Mississippi mud cake had. It had a nice texture and density, although not quite as lovely a texture as Pam's and Bluehue's cakes had. In fact, this ended up being the cake that we all kept going back for more - and could finish each slice without feeling ill!

So we all sat around discussing the merits of each cake, and gorging on mud cake. I had to explain several times to my MIL and FIL that we weren't trying to find the 'truest' mud cake, but the best cake for using in my layer cakes under fondant. They kept leaning towards the Mississippi mud cake simply because it was rich and 'true mud cakes are rich'. I kept trying to explain that yes, true mud cakes are rich, but that's not the be-all end-all, it had to be a cake that guests will keep coming back for second and third slices - no one was going to be doing that with the Mississippi mud cake unless they were planning on being ill for the rest of the day and having an afternoon siesta! Lol, finally they understood what exactly we were looking for and we were ready to vote on our favorites:

A - Pam's chocolate mud cake:
No one voted this one as their favorite
B - Bluehue's mud cake:
No one voted this one as their favorite
C - Exclusively Foods mud cake:
Well obviously this one was taken out of the running so no one voted on this one
D - Best Recipe's chocolate mud cake:
Out of the seven of us voting on the cakes, 5 voted this as their favorite. The other 2 voted this as their second favorite!!
E - Australian Womens Weekly Mississippi Mud Cake:
2 voted this as their favorite cake, the rest of us voted this as our second favorite!

So you can see that there was a clear winner in this scratch test: Best Recipe's chocolate mud cake.
I was really surprised at this result, Bluehue and Pams mud cakes are touted among professional bakers as being among the best recipes but none of us enjoyed them that much (with the exception of my MIL and FIL the first time around - but they changed their minds when doing the blind tasting lol!), and this recipe was just a simple user submitted recipe on the Best Recipe's site. It was among the cheapest to produce of all the cakes, one of the easier ones to make (not that any of them were terribly difficult), and it was perfect for using in 4 layered fondant covered cakes. It's not too rich that you can't go ahead and have a second slice (or a third!), has a distinctly chocolatey flavor, was moist and had a lovely fudge-like density.

Wednesday, 15 May 2013

C.A.M - Mud Cake Scratch-Off - Best Recipe's Mud Cake

I know this post is a bit late, I finished baking this mud cake from the Best Recipes site about one and a half weeks ago. I feel really bad that I haven't gotten around to writing this post earlier because I don't remember making this cake very well anymore :( But I'll do my best to go back over it for you!

Ease of Making:
So, same as with the others, this cake really wasn't all that complex to make. I melt the chocolate, butter, sugar, water and coffee together, then stir into the sifted dry ingredients, then add the eggs. Done. The mix didn't take very long to cool, I probably only left it about half an hour before I went ahead and finished the batter.

Cost:
This cake was the second cheapest cake to make after Pam's mud cake and cost me $6.64AUD in ingredients.


This is how I prepare the pans with a flower nail as a heating core.

I'll be back next with the results of the final tasting!!

Monday, 6 May 2013

C.A.M - Mud Cake Scratch-Off - Exclusively Food's Chocolate Mud Cake

Ease of Making:
Ok, so this cake was a bit more complicated than the other cakes. I mean, it wasn't hard, not even particularly time-consuming, but definitely not as straight forward as the other recipes.
The other recipes, I simply had to melt the chocolate/butter/liquid combo, wait for it to cool and add the flour/eggs/vanilla. Done. This one, I had to melt the chocolate/butter/liquid combo, wait for it to cool, sift the sugar into the already sifted flour combo, whisk the eggs/vanilla/buttermilk separately, stir the egg/vanilla/buttermilk mix into the flour/sugar combo, then add the melted chocolate mix in 3 separate batches.
One of my concerns with this recipe is that the sugar isn't required to be dissolved into the mixture at any point. When doing my research on mud cakes (because I research everything to death) I came across a few comments that one of the most important things with mud cakes is to ensure that the sugar is completely dissolved before baking. I don't know what the difference is but each of the other recipes instructed at some point to dissolve the sugar, whether it was with the chocolate/butter combo on the stove or after adding the sugar/butter combo to the flour.
Also, after I mixed everything together the batter seemed quite thick compared to the other batters which were very runny. It just didn't...seem quite the same as the other recipes at all.
The Exclusively Food website provides ingredient quantities for several different size pans. In cut back on costs I only made the smallest size they provided the quantities for, a 6" round. I have a 6" round pan but the recipe said to use a deep pan, generally a 3-4" high pan and I only had small pans about 1" high so I decided to bake the cake in a larger pan to compensate for the smaller height. I ended up baking the cake in a 10" round pan that was only 1" high. I probably should have used the same pan as I used for the other cakes though because the cake rose way higher than the edges. In fact, I thought for a few moments that the pan was going to overflow but luckily the edges were cooked just enough to keep the batter from overflowing. I also used a heating core in the cake so that may have helped stop it from overflowing.
So the final cake doesn't quite...look right. It didn't dome on top at all, and is very very flaky on top compared to the others and felt like it was falling apart as I was wrapping it up to put it into the freezer. I should have taken a photo but was a bit too concerned to remember!! In fact, I didn't remember to get ANY photos while making this cake!
So we'll have to see whether this cake turns out or not. It's the same recipe I used for last months baby cake so I know what the final result should be like so I'll have to take that into consideration when tasting it. However, I don't know if this cake would be the winner of the scratch-off anyway simply because of the slightly more complicated mixing process. It also ends up being pretty middle-of-the-road, cost-wise...

Cost:
So obviously the cake I made was quite cheap in comparison to the other recipes since I only made the 6" round, but I used the ingredient quantities provided on the site to calculate the cost of a cake the same size as the other recipes and it came up to $7.16AUD, putting it smack in the middle of the pricing test. To be honest, the taste would have to pretty much blow me away for me to prefer this recipe over the others simply because I thought the other recipes were simpler and more reliable. This recipe also used buttermilk which I don't ordinarily use, and it only used a very small amount of buttermilk which means the rest of the carton would go to waste. At least this would be true if I hadn't worked out how to freeze the rest of the buttermilk in ice cube trays so now I probably have enough buttermilk to last me the next 5 years (especially considering this was the first time I've ever bothered buying buttermilk!!).

Once again, no photos. I know. I suck.

Sunday, 5 May 2013

C.A.M - Mud Cake Scratch-Off - Australian Womens Weekly Mississippi Mud Cake

Ease of Making:
Once again, this cake was made nearly exactly the same as the previous two cakes, however the recipe said that the chocolate mixture needed to be cooled down nearly completely before adding the flour and eggs. Luckily it didn't take long at all for it to cool down, by the time I was finished measuring and sifting the flour and eggs etc the mix was basically cool enough to add straight away. I'm not sure why Bluehue's mix took so long to cool down in comparison to the rest of the recipes, perhaps I heated it up a lot more??? This mix probably only took about 15 minutes to cool nearly completely.


The other difference with this recipe was that it called for milk instead of the water that was used in the previous two recipes. We'll have to see how the taste changes with the milk instead of the water.
The cake didn't rise quite as much as the previous two cakes, however I used a heating core in the center while baking so not sure what difference that may have made. It also, like the other cakes, cracked dramatically on top.


Cost:
This cake came out being the 2nd most expensive cake behind Bluehue's cake. I calculated it to cost me $7.35AUD. I think this is largely because of the milk being used in place of water and it, like Bluehue's cake, called for nearly twice the amount of sugar as the rest of the recipes used.