Ok, so now that I've finished making the January cake and also eaten part of it I can start going over some of the mistakes I think I made and things I will do differently first time around.
So in my post from yesterday I showed pictures of the cake once I had finished decorating it. After writing that post I went out to see a movie with DH for his birthday and do some shopping, and when we came home 5 hours later disaster had struck. Once again my cake was afflicted with the battle of the bulge. This time was far worse than last months episode, the flowers had sunk down into the cake, it was bulging and rippling all over the sides, it basically looked like it had melted :(
Unfortunately I didn't take any photos (well I avoided taking any photos because I'm too embarrassed!) but I think I know where I went wrong and what to do next time. For starters, I don't think I'll use lemon curd in my fondant covered cakes again. I think it's just too wet, the very middle of the cake got soggy from soaking up the lemon curd which I think is the reason that the top of the cake sank. I think the cake's sinking let too much air escape which caused a lot of the rippling and bulging. It didn't seem to be so much from the dam not being stiff enough as that looks like one of the few areas where the cake actually held up. (Although next time around I'm still going to try an even stiffer dam!!)
I also don't think that I'll freeze my cakes before filling and stacking them again, next time I think I'll let them cool, put them in the fridge overnight, then level, fill and stack them the next day. Once that's all done I can put it in the freezer, but not before. From what I've read, this somehow has to do with the bulge occuring.
Another thing I'll do next time is compress each layer as I stack them. I've read online from other bakers who press a cake board down on each layer before placing the next layer on top, so they compress the cake and squeeze out the air as they go.
I don't know what more to say, I'm very disappointed by the cake bulging (again!), although I know I should be really proud of what I achieved considering it's only my 2nd fondant covered cake. I think I would feel a lot better about it if my in-laws hadn't seen it! They're pretty much like the perfect family so I always feel very inadequate compared to them; my whole life lately seems to revolve around being who I think they want me to be and constantly feeling like a failure. *Sigh* But that's a whole other post for another day!!! Lol!
Sunday, 20 January 2013
Cake-A-Month - Finished January Cake
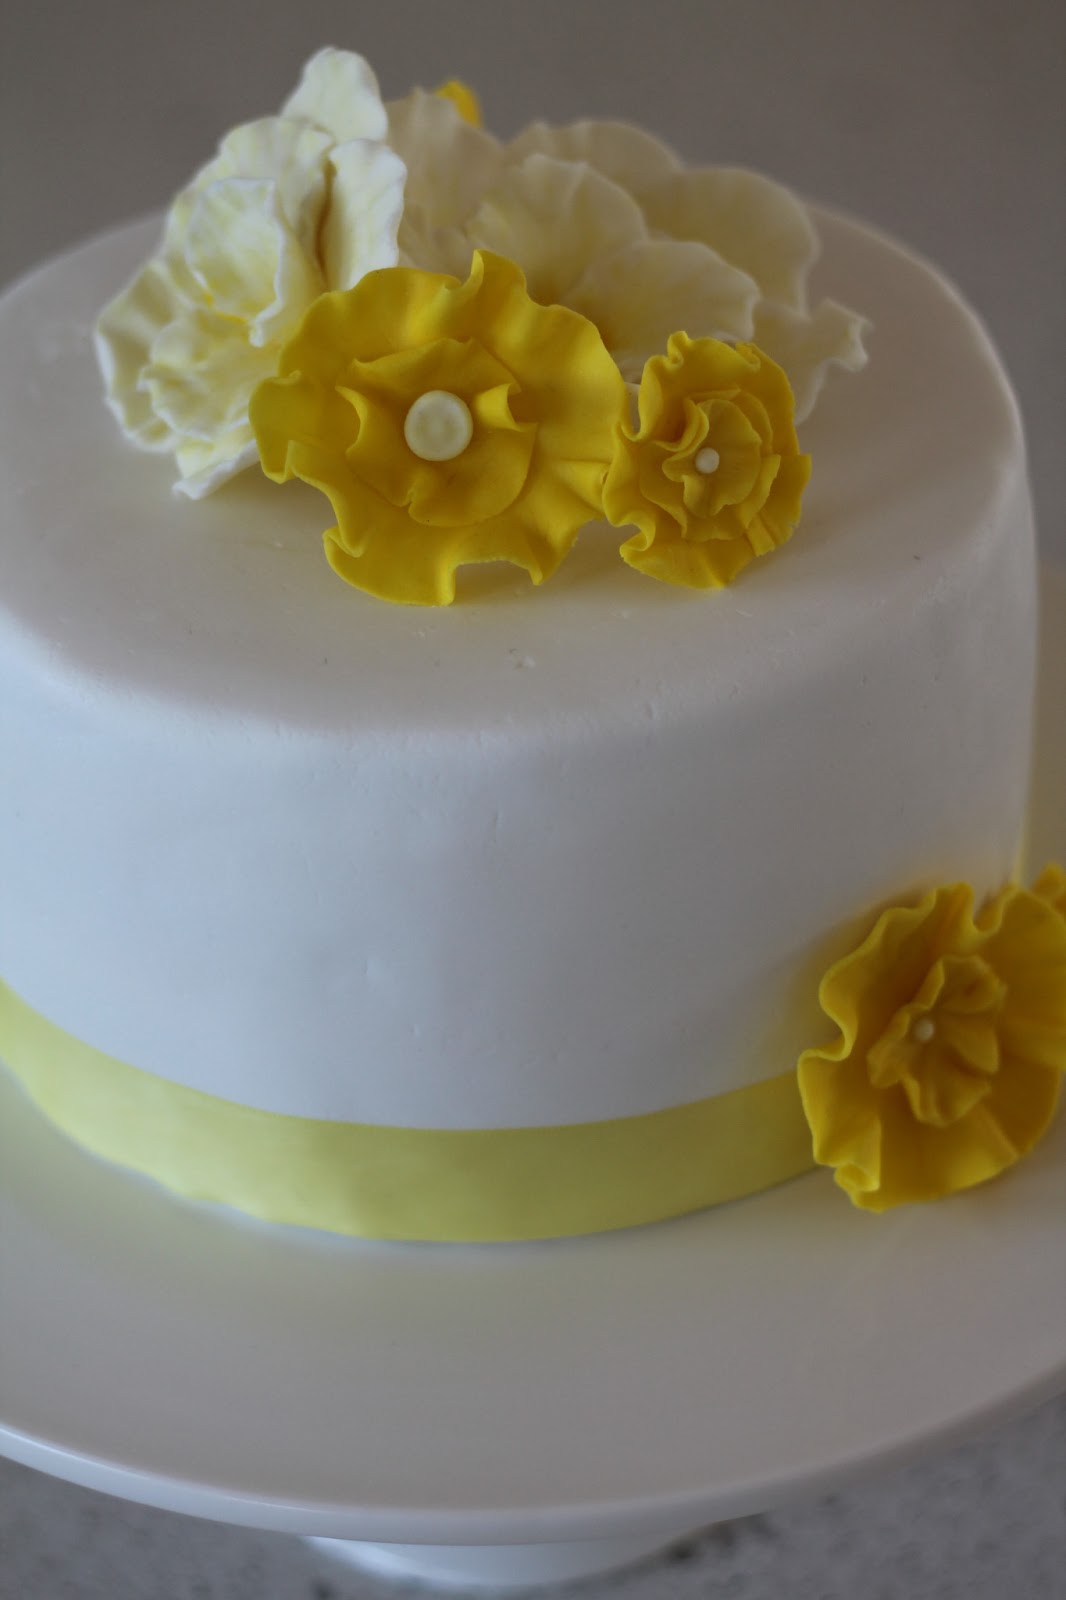
So here's the final reveal of the January cake: a coconut cake layered with lemon curd and frosted with lemon Swiss Meringue Butter Cream, covered in fondant and decorated with gumpaste flowers.
I was actually really surprised at how easy it was to do the fondant this time. I did a few little things differently this time, not exactly sure which thing made the biggest change. For starters I used a different brand of fondant this time. I was going to buy the Satin Ice fondant like I used last time, but my regular supplier was out of the Satin Ice and sent me Orchard brand fondant instead. I was pretty annoyed about this and worried about using the different brand, but the fondant was extremely pliable and soft, didn't get sticky and was very easy to smooth. With last months cake I had colored the fondant with gel food coloring, whereas this time I left it white, so I don't know what difference that made to the workability of the fondant (is workability a word?? Well it is now anyway!)

Last time, I used powdered sugar to stop the fondant from sticking, and then started using shortening when the fondant began cracking. This time however, I only used shortening and had some powdered sugar on standby in case the fondant got too sticky, which it didn't!
And I think the biggest difference was the weather! You may recall me saying that the weather when I was doing the Christmas cake was stinking hot, well I was extremely lucky this time around and the one day I was working with the fondant the weather dropped by like, 10 degrees!
So you can see that after I made two of the rose-style flowers I gave up and made some simple ruffled circle flowers to go with the cake. I got too frustrated with the rose style ones, and they took a lot of time (which I was very short of!) and patience (which I also lack lol!) to make, so I decided to start off testing my skill by doing the simpler flowers for the first couple of cakes before moving onto proper roses. Next time around I'll also color the gumpaste first rather than painting the final product and use luster powder to add dimension.
You can see that the fondant still isn't perfectly smooth, but I'm definitely getting better at it! Practice makes perfect right?
And it was way easy to put the ribbon border on, the hardest thing was lining it up properly so the bottom of the cake was entirely hidden. I don't think you can really see it in the photos but there are a couple of spots where about 3-4mm of cake are visible at the bottom of the border.
I would definitely make sure that next time I make the cake on a cake board, I didn't use one this time because I didn't think it would be necessary, but moving the cake around was a real pain in the butt. I couldn't make the cake on the cake stand because the cake stand wouldn't fit in my fridge so used a regular plate, but it was difficult to cover the cake in fondant on the plate because of the edges!
I have a really handy pizza lifter that I use for lifting and moving my cake layers, but I still had a bit of trouble moving it at the end, so I might buy some of those cheap bulk cake boards off eBay for next time.
So, I'm really, really happy with how the cake turned out and I'm now starting to think about next months cake - maybe a Valentines Day themed cake?? :)
Oh btw, Happy Birthday to my wonderful dear husband, who without a doubt, is the best thing to have ever happened to me - especially since he's given me two beautiful, happy boys!!! I love my family :)
I was actually really surprised at how easy it was to do the fondant this time. I did a few little things differently this time, not exactly sure which thing made the biggest change. For starters I used a different brand of fondant this time. I was going to buy the Satin Ice fondant like I used last time, but my regular supplier was out of the Satin Ice and sent me Orchard brand fondant instead. I was pretty annoyed about this and worried about using the different brand, but the fondant was extremely pliable and soft, didn't get sticky and was very easy to smooth. With last months cake I had colored the fondant with gel food coloring, whereas this time I left it white, so I don't know what difference that made to the workability of the fondant (is workability a word?? Well it is now anyway!)
Last time, I used powdered sugar to stop the fondant from sticking, and then started using shortening when the fondant began cracking. This time however, I only used shortening and had some powdered sugar on standby in case the fondant got too sticky, which it didn't!
And I think the biggest difference was the weather! You may recall me saying that the weather when I was doing the Christmas cake was stinking hot, well I was extremely lucky this time around and the one day I was working with the fondant the weather dropped by like, 10 degrees!
So you can see that after I made two of the rose-style flowers I gave up and made some simple ruffled circle flowers to go with the cake. I got too frustrated with the rose style ones, and they took a lot of time (which I was very short of!) and patience (which I also lack lol!) to make, so I decided to start off testing my skill by doing the simpler flowers for the first couple of cakes before moving onto proper roses. Next time around I'll also color the gumpaste first rather than painting the final product and use luster powder to add dimension.
You can see that the fondant still isn't perfectly smooth, but I'm definitely getting better at it! Practice makes perfect right?
And it was way easy to put the ribbon border on, the hardest thing was lining it up properly so the bottom of the cake was entirely hidden. I don't think you can really see it in the photos but there are a couple of spots where about 3-4mm of cake are visible at the bottom of the border.
I would definitely make sure that next time I make the cake on a cake board, I didn't use one this time because I didn't think it would be necessary, but moving the cake around was a real pain in the butt. I couldn't make the cake on the cake stand because the cake stand wouldn't fit in my fridge so used a regular plate, but it was difficult to cover the cake in fondant on the plate because of the edges!
I have a really handy pizza lifter that I use for lifting and moving my cake layers, but I still had a bit of trouble moving it at the end, so I might buy some of those cheap bulk cake boards off eBay for next time.
So, I'm really, really happy with how the cake turned out and I'm now starting to think about next months cake - maybe a Valentines Day themed cake?? :)
Oh btw, Happy Birthday to my wonderful dear husband, who without a doubt, is the best thing to have ever happened to me - especially since he's given me two beautiful, happy boys!!! I love my family :)
Friday, 18 January 2013
Cake-A-Month - January - Post 6
I've been spending a lot of time over the past few days making the gumpaste flowers for the cake and I've ran into so many problems. I have a big problem with trying out new things: I always want to be perfect, and when my first attempts are less than perfect I get frustrated, dispirited and often, give up. So when I started having problems with the flowers I was nearly ready to kick the bucket with the entire cake a month challenge and give up. But of course I didn't cos I knew I was acting worse than my 3 year old and had to get over myself :)
So a couple of posts back you would have seen my first attempt at gumpaste flowers, which I was quite happy with. I wasn't entirely happy with the structure of the flower though, so I decided to try out a different technique the next time around.
What I tried to do was start in at the middle of the flower (rather than starting with the bottom layer like I did for my first flower) and started by wrapping the inside petals around a toothpick, and gradually building on it with layers of petals. Sounds great huh? Well it didn't quite work out that way. The petals started sticking to everything BUT the other petals, they were drooping and falling off and I couldn't get them to look natural when I finally did get them to stick. I think I ended up throwing a tantrum my toddler would be envious of and threw the whole thing in the bin. Yeah, I'm THAT person :/
So I gave up with it for that day and sat on the computer looking at heaps of different tutorials. I began to realize that gumpaste flowers are a whole different ballpark unto themselves. There was no way in hell I was going to sit down and come up with flawless, beautiful flowers until I'd been practicing for a loooong time. I picked up a few little tidbits of info that have really helped me though:
1. The sugar glue isn't going to instantly 'glue' the pieces together. It's going to take time and I need to apply each petal individually and wait till that one is stable before moving onto the next. (Well the way I was building them it needed to be done that way anyway!)
2. Brushing the petals with the food coloring like I had been planning on doing just wasn't going to work that way. The lemon juice was making them dry super shiny and I'm not exactly an artist so I wasn't doing the worlds best painting job! A better technique would have been to color the gumpaste yellow, then use luster powder to add dimension and make the color appear more natural.
3. Trying to make the flowers by working on each petal and putting them together probably wasn't the best method to pick for my first attempt. I would have been better off starting with actual flower cutters, or large circles to make ruffled layer flowers.
4. Having the proper size/shape moulds for my flowers to dry in would have been a huge help.
So tonight I sat down and started playing around with the gumpaste again, using some of the techniques I'd learnt online. I decided not to pursue the elaborate flowers I was attempting before, while I had managed to produce one nice one the rest were just out of my skill and only succeeded in frustrating me.
Here are the flowers I ended up with:

Much simpler than the other ones I was doing, but probably more suited to a beginner like me :) And on the plus side, they're far less frustrating than the other ones LOL!
Anyway, just as I was starting to get the hang of it (and finally working out how to roll the gumpaste thin!), the stupid gumpaste tool I've been using to ruffle the edges broke!! :(
Luckily my very handy DH whipped out the superglue and fixed it up for me, but now I need to wait overnight for it to dry :(
While waiting I thought I'd try out my new letter press from Clikstix.

I was really looking forward to using this and being able to finish off the January cake with a happy birthday message to my hubby BUT I couldn't get the stupid things to work properly. I have no idea how people use these stupid things, you're supposed to brush your gumpaste with icing sugar to stop it from sticking, then simply press down on the gumpaste with the clikstix cutter, press down on the edges, lift it up and press down the ejector bit to eject the letter.
NOPE. It does NOT work like that. This is how it works:
1. Press the clikstix cutter down on the gumpaste and press the edges down.
2. Lift up the clikstix cutter and all of the gumpaste along with it.
3. Try to peel the excess gumpaste off without much luck.
4. Push down on the ejector to eject the letter. Watch in frustration as nothing ejects.
5. Get out a toothpick to dig the gumpaste out from the letter section.
6. Soak in water overnight to get rid of the gumpaste.
Anyone know how to use these stupid things???? If so, PLEASE TELL ME!!! Otherwise I'm giving up and buying the cookie cutter style ones on eBay!
So a couple of posts back you would have seen my first attempt at gumpaste flowers, which I was quite happy with. I wasn't entirely happy with the structure of the flower though, so I decided to try out a different technique the next time around.
What I tried to do was start in at the middle of the flower (rather than starting with the bottom layer like I did for my first flower) and started by wrapping the inside petals around a toothpick, and gradually building on it with layers of petals. Sounds great huh? Well it didn't quite work out that way. The petals started sticking to everything BUT the other petals, they were drooping and falling off and I couldn't get them to look natural when I finally did get them to stick. I think I ended up throwing a tantrum my toddler would be envious of and threw the whole thing in the bin. Yeah, I'm THAT person :/
So I gave up with it for that day and sat on the computer looking at heaps of different tutorials. I began to realize that gumpaste flowers are a whole different ballpark unto themselves. There was no way in hell I was going to sit down and come up with flawless, beautiful flowers until I'd been practicing for a loooong time. I picked up a few little tidbits of info that have really helped me though:
1. The sugar glue isn't going to instantly 'glue' the pieces together. It's going to take time and I need to apply each petal individually and wait till that one is stable before moving onto the next. (Well the way I was building them it needed to be done that way anyway!)
2. Brushing the petals with the food coloring like I had been planning on doing just wasn't going to work that way. The lemon juice was making them dry super shiny and I'm not exactly an artist so I wasn't doing the worlds best painting job! A better technique would have been to color the gumpaste yellow, then use luster powder to add dimension and make the color appear more natural.
3. Trying to make the flowers by working on each petal and putting them together probably wasn't the best method to pick for my first attempt. I would have been better off starting with actual flower cutters, or large circles to make ruffled layer flowers.
4. Having the proper size/shape moulds for my flowers to dry in would have been a huge help.
So tonight I sat down and started playing around with the gumpaste again, using some of the techniques I'd learnt online. I decided not to pursue the elaborate flowers I was attempting before, while I had managed to produce one nice one the rest were just out of my skill and only succeeded in frustrating me.
Here are the flowers I ended up with:
Much simpler than the other ones I was doing, but probably more suited to a beginner like me :) And on the plus side, they're far less frustrating than the other ones LOL!
Anyway, just as I was starting to get the hang of it (and finally working out how to roll the gumpaste thin!), the stupid gumpaste tool I've been using to ruffle the edges broke!! :(
Luckily my very handy DH whipped out the superglue and fixed it up for me, but now I need to wait overnight for it to dry :(
While waiting I thought I'd try out my new letter press from Clikstix.
I was really looking forward to using this and being able to finish off the January cake with a happy birthday message to my hubby BUT I couldn't get the stupid things to work properly. I have no idea how people use these stupid things, you're supposed to brush your gumpaste with icing sugar to stop it from sticking, then simply press down on the gumpaste with the clikstix cutter, press down on the edges, lift it up and press down the ejector bit to eject the letter.
NOPE. It does NOT work like that. This is how it works:
1. Press the clikstix cutter down on the gumpaste and press the edges down.
2. Lift up the clikstix cutter and all of the gumpaste along with it.
3. Try to peel the excess gumpaste off without much luck.
4. Push down on the ejector to eject the letter. Watch in frustration as nothing ejects.
5. Get out a toothpick to dig the gumpaste out from the letter section.
6. Soak in water overnight to get rid of the gumpaste.
Anyone know how to use these stupid things???? If so, PLEASE TELL ME!!! Otherwise I'm giving up and buying the cookie cutter style ones on eBay!
Tuesday, 15 January 2013
Cake-A-Month - January - Post 5
So today I made the Swiss Meringue Butter Cream for the January cake. For some reason I was incredibly nervous about making the SMBC. I'd read so much about how difficult it is to make, about people that had attempted it only to end up with a curdled mess that needed to be thrown out. I'd also read a lot about how it's a bit of an acquired taste since it's so incredibly different from the typical icing sugar-butter frosting that you'll find on most cakes.
I also knew it involved making a meringue, which I've never attempted before, and I'd also read a lot about meringues flopping due to a tiny bit of grease getting into the mixture or eggs being old etc. Long story short, I was incredibly nervous about this step of making the January cake.
I didn't need to be so nervous! I followed the instructions and guide from Sweetapolita and ended up with a beautiful glossy frosting! I had to continue whipping the frosting for about 10 minutes longer than she stated before it cooled down enough to add the butter, and I followed her instructions to make a lemon flavoured buttercream. I also halved her recipe since her recipe makes 10 cups and I definitely didn't need that much! I only needed the frosting to make the dams in each layer and dirty ice the cake, and the halved recipe was more than enough.

Once I had finished the SMBC I stacked and filled the layers for the cake. I had made four layers, and piped a stiff dam of SMBC around each before filling with a thin layer of the lemon curd I'd already made.

Once stacked and filled, I dirty iced the cake and put it in the fridge to settle.

I didn't get a photo of the cake once it had been dirty iced, sorry, I must have been distracted! I'll take a photo before I cover it in fondant in a couple of days :)
I also knew it involved making a meringue, which I've never attempted before, and I'd also read a lot about meringues flopping due to a tiny bit of grease getting into the mixture or eggs being old etc. Long story short, I was incredibly nervous about this step of making the January cake.
I didn't need to be so nervous! I followed the instructions and guide from Sweetapolita and ended up with a beautiful glossy frosting! I had to continue whipping the frosting for about 10 minutes longer than she stated before it cooled down enough to add the butter, and I followed her instructions to make a lemon flavoured buttercream. I also halved her recipe since her recipe makes 10 cups and I definitely didn't need that much! I only needed the frosting to make the dams in each layer and dirty ice the cake, and the halved recipe was more than enough.
Once I had finished the SMBC I stacked and filled the layers for the cake. I had made four layers, and piped a stiff dam of SMBC around each before filling with a thin layer of the lemon curd I'd already made.
Once stacked and filled, I dirty iced the cake and put it in the fridge to settle.
I didn't get a photo of the cake once it had been dirty iced, sorry, I must have been distracted! I'll take a photo before I cover it in fondant in a couple of days :)
Sunday, 13 January 2013
Cake-A-Month - January - Post 4

So I baked another batch of the coconut white cake from Beyond Buttercream. This time I doubled the recipe and made a couple of small tweaks - nothing major!
Last time I had put the equivalent of how much sour cream and milk were in the recipe which had come to approx. 450ml's if I recall correctly, however this time I just substituted 1x 400ml can of coconut milk per batch (so 2 cans for the doubled recipe). I also added more dessicated coconut (probably about one small handful extra). Also (and this probably sounds really obvious!) I added the coconut with the rest of the dry ingredients, whereas with the first batch I baked I had added it at the end where the recipe stated to add your flavourings.
So no major changes, although there was about 100ml less liquid in the end, and the cake turned out completely different! No problems with the batter being too runny this time, and the finished cake was light and fluffy inside instead of dense and moist. To be honest, I was slightly disappointed at the difference, along with my husband and in-laws who tasted the cake. We all agreed that while we could tell that the light and fluffy cake was what the end result was supposed to be, and probably what you would expect if buying a cake from a bakery, we all actually preferred the dense moist cake which had too much liquid. It seemed like...OH! I finally figured out what the texture of the other cake reminded me of! MUD CAKE! It reminded me of a white chocolate/coconut mud cake! Well, now maybe you can understand why we all really liked it LOL!
Well the final cakes (doubling the recipe made 5x 1" high 8" round cakes) tasted lovely, and would be perfectly fine if we hadn't tasted the mistake cakes of the day before! Now I think I'm going to have to go on a hunt for the perfect white chocolate mud cake recipe haha!
I then started experimenting with making the flowers for the cake. I had purchased 250gms of Cake Art's flower modelling paste (seems to me that it's simply gumpaste), a set of teardrop shaped cookie cutters and a set of fondant tools from eBay. I cut out a bunch of teardrops from thinly rolled gumpaste, used the ball tool to lightly ruffle the edges and glued them together with sugar syrup. I set the flowers in a small glass bowl overnight to dry.
 |
| Fantasy Ruffle Flower |
While I had a bit of time tonight I grabbed my new paint brush bought just for my cake decorating, and mixed a bit of yellow food coloring (I use Americolor gel colors) with lemon juice (I got this tip from Savannah Custom Cakes - check out their extremely informative videos on YouTube here!) and painted the center of the flower, lightly brushing the color out along the petals.
In hindsight, I should have painted each petal before building the flower, but I was mainly just testing at the time and didn't think ahead :)

I also made a batch of lemon curd today to go between the layers of the cake. I used the ingredients from this recipe for the lemon curd (except I used all egg yolks that I had leftover from baking the cake), but used the instructions from this recipe to make it in the microwave. Oh, and I ended up adding about 1/4C of extra sugar because I found the lemon curd slightly too tart for my taste. It worked well anyway and the final result was a really nice creamy lemon curd. I just worry that it may not be quite enough to fill the cakes!
Thursday, 10 January 2013
Cake-A-Month - January - Post 3
Fret not, I haven't forgotten you! I haven't quite gotten to that point where the posts slowly dwindle and die (give me another month for that to happen!). I haven't posted because so far, there's being nothing to post! I haven't been able to get started on January's cake because the weather has been absolutely terrible here! Here in Australia we've been going through one of the worst heatwaves in recorded history causing some of the worst bushfire conditions we've ever seen, suffice it to say I wasn't exactly thrilled at the idea of turning on the oven and heating the house up even more!! Working with fondant in this weather isn't exactly a welcome idea either!
So today was the first day with cooler weather and according to the weather forecasts it wasn't going to last for long so I quickly grabbed the chance to bake the cakes for the January cake.
I used Beyond Buttercream's white cake recipe, but made a coconut variation as per her instructions. I made a couple of variations though:
Instead of cake flour I used plain flour mixed with a couple of tablespoons of corn flour. Cake flour is quite hard to come by in Australia and when you do find it it's significantly more expensive than regular flour. According to Google using corn flour in plain flour is a popular substitute so I figured I'd go with that.
I used butter instead of shortening since it's also difficult to come by shortening in Australia. The only readily available shortening is made 100% from transfats and is pretty gross.
As per Beyond Buttercreams instructions for the coconut variation I substituted the milk and sour cream for coconut milk and added a handful of desiccated coconut.
When I was making the batter for the cake I was a bit worried. The batter was reeeeally runny, despite her instructions saying that the batter should be thickening up. The butter also wasn't completely mixing through. Her instructions said to add the liquid and butter all at once but the batter ended up too runny to properly mix the butter through. I felt like the sour cream shouldn't have been substituted for coconut milk since the liquid content of the two are drastically different. I went ahead with the recipe anyway and decided to see what happens.
 |
| Chunky, soup-like texture. |
While the cakes were baking I got even more worried. The cakes were rising strangely, one side would rise while the other side stayed at the same level, the top was bubbling away like it was boiling on the stove and was very crispy looking at the same time. It was very very odd looking and I sorta gave in to the fact that the cakes had failed and I would have to start over again.
 |
| The best of the 3 cakes. Crispy appearance to the top. |
Then when the cakes were finished and I went to turn them out onto cooling trays, something amazing happened.
While the tops of the cakes were all strange and crispy appearing, the bottoms of the cakes looked PERFECT! The texture seemed right, they were slightly golden in appearance and didn't seem any different from any other cake I would have baked. I then realised that the strange appearance of the tops were because all the desiccated coconut had risen to the top of the cake during the baking process. I still had to taste them though - just to test, of course!! ;)
 |
| Perfection! |
Mmmmm, these cakes are sooo good. I was a bit surprised at the inside texture of the cake, the inside is very moist and slightly...dense?? but in a really good way (I know it sounds totally weird!), sorta like the inside of brownies. I think it would actually work really well under fondant, it won't dry out like the Christmas cake did, and should be firm enough to hold up under the fondant. They actually reminded me a lot of the wedding cake at a friends wedding. We all really loved the cake and were eating it for weeks afterwards (they were living with us at the time) and we all commented on the strange but delicious texture of the cake - moist, but slightly fudge-like. Maybe the baker uses the same recipe?? Lol
I'm going to have to bake more tomorrow, I somehow ended up eating all of them in the testing process, woops! I'll let you know how tomorrows attempt goes :)
Saturday, 5 January 2013
Pretty As A Picture - ISO
The next exercise from It's Overflowing's photography course is on ISO.
It took me a little bit to understand ISO. At first when reading her post on ISO basically all I understood was that the higher ISO settings capture more light than the lower setting, so I couldn't understand why you didn't simply always use the highest ISO setting. I sorta got that the higher ISO settings were supposedly more grainy, but I couldn't see any discernable difference in her photos and later when I was experimenting with ISO levels, I couldn't see any difference in my photos either. Totally confuzzled!!
It wasn't till I skipped forward to the next post on Metering that I understood better how to see the difference in quality between the higher and lower ISO settings. What she recommended doing was zooming in on the same area of the photo for the lowest ISO and highest ISO settings to see the difference in quality. I was pretty surprised at the result when I did this.

The clarity of the lower setting is pretty obvious when zoomed in! So I'm figuring that means that you should try and use the lowest ISO possible in whichever given situation you're in, but if you're not intending on enlarging the image or using high-res images than you'd probably be ok if your ISO is too high anyway.
Pretty excited to go onto the next part which is basically using all 3 of the previous elements (Aperture, Shutter speed & ISO) together in manual mode and using metering to balance the 3 together.
It took me a little bit to understand ISO. At first when reading her post on ISO basically all I understood was that the higher ISO settings capture more light than the lower setting, so I couldn't understand why you didn't simply always use the highest ISO setting. I sorta got that the higher ISO settings were supposedly more grainy, but I couldn't see any discernable difference in her photos and later when I was experimenting with ISO levels, I couldn't see any difference in my photos either. Totally confuzzled!!
 |
| Can you see any difference between the low and high settings?? |
It wasn't till I skipped forward to the next post on Metering that I understood better how to see the difference in quality between the higher and lower ISO settings. What she recommended doing was zooming in on the same area of the photo for the lowest ISO and highest ISO settings to see the difference in quality. I was pretty surprised at the result when I did this.
Pretty excited to go onto the next part which is basically using all 3 of the previous elements (Aperture, Shutter speed & ISO) together in manual mode and using metering to balance the 3 together.
Friday, 4 January 2013
Pretty As A Picture - Bloody White Balance!!
So for anyone that saw the photos I'd been taking in my recent posts probably would have noticed that all my photos were coming out kinda bluish. Well I noticed it anyway, and it was driving me batty!! I sorta figured that the reason they were coming out bluish was to do with the special insulated windows we have in the house and they must have been acting as some sort of special filter bringing out the blue tones.
Well, it sounded nice and all scientific-ish (yes, that is now a word: scientific-ish :P ), but I was waaaay off the mark. Turns out that while playing around with the manual settings, somehow I'd changed the white balance to yellow tungsten lighting, so the camera was compensating by bringing out the blue hues in everything. Meanwhile what I really needed the white balance on was the shade setting which made my photos start coming out looking warm and closer to what I was really seeing with my own eyes.
So without further ado, here are some redo's of my choc-chip cookies with the right settings:
Thursday, 3 January 2013
Cake-A-Month - January - Post 2
Here's a mockup of the cake I want to make for January:

Wish me luck!
Wednesday, 2 January 2013
Date And Pecan Pudding Makes Everything Better!
I woke up this morning to unbearable pain in my left leg. It was so bad I couldn't bend over to put Baby Z down and within 15 minutes had gotten so bad that I couldn't put weight on my leg at all without feeling like I was being stabbed in the leg with hot knives. Since I was pregnant with A I've had ongoing problems with pinched nerves in my left leg, it comes and goes and this was the first sign of pain since I was pregnant with Baby Z.
I had planned on going into town to do the grocery shopping, get A's hair cut and pick up some used bed rails I had bought online for A's bed, but had to cancel my plans so I could give my leg a rest :(
Luckily my MIL made me some yummy date and pecan puddings to cheer me up.

I had planned on going into town to do the grocery shopping, get A's hair cut and pick up some used bed rails I had bought online for A's bed, but had to cancel my plans so I could give my leg a rest :(
Luckily my MIL made me some yummy date and pecan puddings to cheer me up.
Doesn't it make you feel better just looking at it?? And check out that gooey caramel sauce! Mmmm...
Choc-Chip Goodness
I made a batch of chocolate chip cookies today. I found this recipe a couple of months back on allrecipes.com but adapted it a little bit more to my tastes - not much, just a couple of little tweaks that made them go from good to absolute heaven!
I'm not a big fan of crunchy cookies - although I will still continue to scoff them down! - and I love love love gooey chocolate chip cookies that are slightly crisp on the outside and soft and chewy in the middle. These cookies were touted as being the best chewy choc-chip cookie recipe but when I tried it the cookies came out quite crunchy - not hard, but just crumbly and dry :/ And they were very, very sweet.
Now don't get me wrong, I love sweet cookies, but I also love being able to scoff down a whole plate of cookies without feeling like I'm going to throw up. I could only eat these cookies when I had a cup of tea to wash them down with.
Now a word of warning, this recipe makes a lot. Like, a LOT. On the original recipe it said it made about 18 cookies. When I first cooked these cookies, just before Christmas, I needed to make enough for 4 food hampers I was making as gifts, plus I also wanted some leftover for me tohide in the closet and devour share with my family. I wanted at least 12 per hamper so I decided to make 4 batches, that should make roughly 72 cookies. Well I made a double batch first and ended up with at least 75 cookies :O And that was after eating some and losing count a couple of times! So I'd say that a better approximation at how many cookies this recipe makes is about 35ish.
Yummy Gooey Chewy Choc-Chip Cookies
2 cups plain flour
1/2 teaspoon baking soda
1/2 teaspoon salt
170g unsalted butter, melted
1 cup brown sugar, packed
1 tablespoon vanilla essence
1 egg
1 egg yolk
1 packet of chocolate chips (usually the equivalent of 1 cup)
I'm not a big fan of crunchy cookies - although I will still continue to scoff them down! - and I love love love gooey chocolate chip cookies that are slightly crisp on the outside and soft and chewy in the middle. These cookies were touted as being the best chewy choc-chip cookie recipe but when I tried it the cookies came out quite crunchy - not hard, but just crumbly and dry :/ And they were very, very sweet.
Now don't get me wrong, I love sweet cookies, but I also love being able to scoff down a whole plate of cookies without feeling like I'm going to throw up. I could only eat these cookies when I had a cup of tea to wash them down with.
 |
| Yummy choc-chip cookies. Excuse the bad lighting, I was in a hurry to eat them!! |
Now a word of warning, this recipe makes a lot. Like, a LOT. On the original recipe it said it made about 18 cookies. When I first cooked these cookies, just before Christmas, I needed to make enough for 4 food hampers I was making as gifts, plus I also wanted some leftover for me to
Yummy Gooey Chewy Choc-Chip Cookies
2 cups plain flour
1/2 teaspoon baking soda
1/2 teaspoon salt
170g unsalted butter, melted
1 cup brown sugar, packed
1 tablespoon vanilla essence
1 egg
1 egg yolk
1 packet of chocolate chips (usually the equivalent of 1 cup)
- Preheat the oven to 165 degrees celsius (I have a fan-forced oven which seems to run hotter than most so I only put my oven on 155 degrees). Line cookie sheets with baking paper.
- Sift together the flour, baking soda and salt and set aside.
- In a separate mixing bowl cream together the butter and sugar till well mixed and light.
- Beat in the egg, egg yolk and vanilla until light and creamy.
- Add in the sifted ingredients until just mixed.
- Carefully fold in the chocolate chips.
- Drop teaspoons of the cookie dough onto the cookie sheets about 2 inches apart.
- Bake for 8-10 minutes or until the edges just start to lightly brown.
- Cool on cookie sheets for a couple of minutes before transferring to cooling racks.
- Put on the kettle, make yourself a cuppa and hide in the closet to enjoy!
- In the past I've had success with substituting half the butter for crunchy peanut butter to make yummy peanut butter choc chip cookies. I haven't tried it with this recipe yet, so if anyone else wants to test it for me be sure to let me know how it goes!
- The first time I made these I added just the one bag of choc-chips per batch, today when I made them I made a double batch with 3 bags simply cos I wanted to use up the last bag in the pantry! They taste great with extra choc-chips but still lovely with just the one.
- The cookies will be quite pale in color, this isn't a crunchy choc-chip recipe which is normally more golden. They'll have just touch of color to the edges but not much.
Tuesday, 1 January 2013
Pretty As A Picture - Shutter Speed
So we've come to the second post in It's Overflowing's week-by-week photography course and this time it's all about shutter speed. It's pretty straightforward, but something that I didn't know before starting the course was that the faster the shutter speed, the less light allowed in. Makes sense but it's something I had never really thought about prior to reading her post.
I also didn't know what the numbers actually meant, so that's something else I've learnt. Just goes to show, you learn something new every day!
In her post she recommended taking photos of a dripping tap to practice with different shutter speeds. Well once again I had Baby Z on my lap so I took photos of the closest, most convenient item: the ceiling fan. It actually worked pretty well for this exercise. I knew what to expect (it's just shutter speed afterall, not like using white balance for the first time!) but I was still surprised at how using the 1/80 speed was fast enough to nearly freeze the fan blades, which was on the highest setting. My camera/lens combo I used could go right up to 1/4000 so I'm curious to see how a photo of something at that speed would turn out (with decent enough lighting of course!).
Before I put up my results I just want to quickly explain that I didn't have great lighting for these shots. In fact, I'm not particularly focusing on getting great lighting or great shots for now, I just want to learn how to use each feature on its own (and understand how it works/what it does) before I begin putting them together...although I do play around with the settings at other times. So the first lot of photos I'm putting up are the original shots, no editing whatsoever. The second lot of photos are the same photos but brightened up with Photoshop so you can actually see what the photos are of! Plus, I find it interesting to see the amount of light let in in each photo as the shutter speed was changed.


Not only can you see the differences in the obvious such as amount of blur from the fan blades and lighting, but you can see the clarity and sharpness of the image improving as the lens is allowed open for longer. Guess that's part of the whole letting in more light thing.
The next post is about ISO. She recommends doing this one outside in lots of natural light, so I may take a couple of days to come back with my results from this one as I don't get a lot of time outside at the moment!
I also didn't know what the numbers actually meant, so that's something else I've learnt. Just goes to show, you learn something new every day!
In her post she recommended taking photos of a dripping tap to practice with different shutter speeds. Well once again I had Baby Z on my lap so I took photos of the closest, most convenient item: the ceiling fan. It actually worked pretty well for this exercise. I knew what to expect (it's just shutter speed afterall, not like using white balance for the first time!) but I was still surprised at how using the 1/80 speed was fast enough to nearly freeze the fan blades, which was on the highest setting. My camera/lens combo I used could go right up to 1/4000 so I'm curious to see how a photo of something at that speed would turn out (with decent enough lighting of course!).
Before I put up my results I just want to quickly explain that I didn't have great lighting for these shots. In fact, I'm not particularly focusing on getting great lighting or great shots for now, I just want to learn how to use each feature on its own (and understand how it works/what it does) before I begin putting them together...although I do play around with the settings at other times. So the first lot of photos I'm putting up are the original shots, no editing whatsoever. The second lot of photos are the same photos but brightened up with Photoshop so you can actually see what the photos are of! Plus, I find it interesting to see the amount of light let in in each photo as the shutter speed was changed.
Not only can you see the differences in the obvious such as amount of blur from the fan blades and lighting, but you can see the clarity and sharpness of the image improving as the lens is allowed open for longer. Guess that's part of the whole letting in more light thing.
The next post is about ISO. She recommends doing this one outside in lots of natural light, so I may take a couple of days to come back with my results from this one as I don't get a lot of time outside at the moment!
Subscribe to:
Posts (Atom)