So for the final test in this months scratch-off I invited over a few friends to help me sample each of the cakes and judge them each based on the flavor, moistness, and density.
I cut a portion of each cake into small 1.5cm pieces and set them out on the table, and labelled each one from A-E. Each person was given a piece of paper and pen to write down their thoughts on each cake, and a cup of tea or coffee to enjoy.
Bluehue's Chocolate Mud Cake:
Everyone agreed that this cake was very very rich. It also seemed to have an odd, nearly floury underlying flavor/aftertaste. It's a flavor that I've come across quite often in chocolate cakes, most people don't seem to mind, or even notice it, but DH and I have always being able to pick up on it and don't tend to enjoy cakes that have that flavor. It's a shame because I really, really wanted to like this cake, I'd heard so many wonderful things about Bluehue's mud cake but it just really wasn't enjoyable to me. It had a wonderful texture and density to it though and the coconut milk added a very unique richness to the cake. You couldn't pick up a coconut flavor until you were told that it contained coconut milk.
Pam's Chocolate Mud Cake:
This cake was very similar to Bluehue's mud cake, although without that extra richness added from the coconut milk. We could also detect that floury flavor/aftertaste that we detected in Bluehue's mud cake, which instantly turned off DH and I. It was still very rich however, and had a lovely texture and density to it. In fact, we had sorta cheated and prior to doing the proper tasting had cut some small slices out of each cake to test before our friends came over. My MIL and FIL when tasting the cakes the first time around both chose this cake as their favorite - although DH and I both disliked it due to the floury flavor/aftertaste. However, when we did the second blind tasting they both disliked this cake and my FIL even picked up on the same floury flavor/aftertaste that DH and I could detect.
Australian Womens Weekly Mississippi Mud Cake:
This was one of our favorites of all the cakes. It was sooo yummy BUT very very very rich!! We all agreed that this cake would be fantastic as a slice or brownie but was simply too rich for a cake - especially if used for a 4 layer cake with chocolate ganache and fondant!! We all kept going back for more, but could only eat a very very small piece at a time. It was a very dense, smooth cake, almost like dark chocolate fudge. It's certainly a recipe I would keep and make again, but as I explained to my taste testers I want to make cakes that taste delicious but aren't so rich that no one can ever finish their slice. I dislike being given slices of cakes that are so rich that I can only ever eat a couple of bites before being done.
Exclusively Foods Chocolate Mud Cake:
I'm not sure what went wrong with this cake. Remember when I made this cake that I felt as though something was off with the batter and the final product? The cake didn't look or feel the same as the others and the batter felt a different consistency. Well when we cut into this cake we found that oddly, rather than having the same fudge-like density of the other mud cakes, this cake was actually fluffy inside and nearly like a regular old chocolate sponge cake. It was nice in its own way, but certainly didn't resemble a mud cake! I used this recipe for my March cake and it turned out fine, however I had used the original quantities, whereas for the scratch-off I used their pan size ingredient chart to make a smaller 6" cake. I'm not sure if the error was in their calculations or if I made a mistake when making the cake. Either way, the final product wasn't really valid for testing, so we chose not to include this when comparing the different cakes as we didn't feel it truly represented an Exclusively Foods mud cake.
Best Recipe's Chocolate Mud Cake:
This cake had a lovely chocolatey flavor without the super-richness that the Mississippi mud cake had. It had a nice texture and density, although not quite as lovely a texture as Pam's and Bluehue's cakes had. In fact, this ended up being the cake that we all kept going back for more - and could finish each slice without feeling ill!
So we all sat around discussing the merits of each cake, and gorging on mud cake. I had to explain several times to my MIL and FIL that we weren't trying to find the 'truest' mud cake, but the best cake for using in my layer cakes under fondant. They kept leaning towards the Mississippi mud cake simply because it was rich and 'true mud cakes are rich'. I kept trying to explain that yes, true mud cakes are rich, but that's not the be-all end-all, it had to be a cake that guests will keep coming back for second and third slices - no one was going to be doing that with the Mississippi mud cake unless they were planning on being ill for the rest of the day and having an afternoon siesta! Lol, finally they understood what exactly we were looking for and we were ready to vote on our favorites:
A - Pam's chocolate mud cake:
No one voted this one as their favorite
B - Bluehue's mud cake:
No one voted this one as their favorite
C - Exclusively Foods mud cake:
Well obviously this one was taken out of the running so no one voted on this one
D - Best Recipe's chocolate mud cake:
Out of the seven of us voting on the cakes, 5 voted this as their favorite. The other 2 voted this as their second favorite!!
E - Australian Womens Weekly Mississippi Mud Cake:
2 voted this as their favorite cake, the rest of us voted this as our second favorite!
So you can see that there was a clear winner in this scratch test: Best Recipe's chocolate mud cake.
I was really surprised at this result, Bluehue and Pams mud cakes are touted among professional bakers as being among the best recipes but none of us enjoyed them that much (with the exception of my MIL and FIL the first time around - but they changed their minds when doing the blind tasting lol!), and this recipe was just a simple user submitted recipe on the Best Recipe's site. It was among the cheapest to produce of all the cakes, one of the easier ones to make (not that any of them were terribly difficult), and it was perfect for using in 4 layered fondant covered cakes. It's not too rich that you can't go ahead and have a second slice (or a third!), has a distinctly chocolatey flavor, was moist and had a lovely fudge-like density.
Showing posts with label Cake-A-Month Challenge. Show all posts
Showing posts with label Cake-A-Month Challenge. Show all posts
Monday, 27 May 2013

Wednesday, 15 May 2013
C.A.M - Mud Cake Scratch-Off - Best Recipe's Mud Cake
I know this post is a bit late, I finished baking this mud cake from the Best Recipes site about one and a half weeks ago. I feel really bad that I haven't gotten around to writing this post earlier because I don't remember making this cake very well anymore :( But I'll do my best to go back over it for you!
Ease of Making:
So, same as with the others, this cake really wasn't all that complex to make. I melt the chocolate, butter, sugar, water and coffee together, then stir into the sifted dry ingredients, then add the eggs. Done. The mix didn't take very long to cool, I probably only left it about half an hour before I went ahead and finished the batter.
Cost:
This cake was the second cheapest cake to make after Pam's mud cake and cost me $6.64AUD in ingredients.


I'll be back next with the results of the final tasting!!
Ease of Making:
So, same as with the others, this cake really wasn't all that complex to make. I melt the chocolate, butter, sugar, water and coffee together, then stir into the sifted dry ingredients, then add the eggs. Done. The mix didn't take very long to cool, I probably only left it about half an hour before I went ahead and finished the batter.
Cost:
This cake was the second cheapest cake to make after Pam's mud cake and cost me $6.64AUD in ingredients.
 |
| This is how I prepare the pans with a flower nail as a heating core. |
I'll be back next with the results of the final tasting!!
Monday, 6 May 2013
C.A.M - Mud Cake Scratch-Off - Exclusively Food's Chocolate Mud Cake
Ease of Making:
Ok, so this cake was a bit more complicated than the other cakes. I mean, it wasn't hard, not even particularly time-consuming, but definitely not as straight forward as the other recipes.
The other recipes, I simply had to melt the chocolate/butter/liquid combo, wait for it to cool and add the flour/eggs/vanilla. Done. This one, I had to melt the chocolate/butter/liquid combo, wait for it to cool, sift the sugar into the already sifted flour combo, whisk the eggs/vanilla/buttermilk separately, stir the egg/vanilla/buttermilk mix into the flour/sugar combo, then add the melted chocolate mix in 3 separate batches.
One of my concerns with this recipe is that the sugar isn't required to be dissolved into the mixture at any point. When doing my research on mud cakes (because I research everything to death) I came across a few comments that one of the most important things with mud cakes is to ensure that the sugar is completely dissolved before baking. I don't know what the difference is but each of the other recipes instructed at some point to dissolve the sugar, whether it was with the chocolate/butter combo on the stove or after adding the sugar/butter combo to the flour.
Also, after I mixed everything together the batter seemed quite thick compared to the other batters which were very runny. It just didn't...seem quite the same as the other recipes at all.
The Exclusively Food website provides ingredient quantities for several different size pans. In cut back on costs I only made the smallest size they provided the quantities for, a 6" round. I have a 6" round pan but the recipe said to use a deep pan, generally a 3-4" high pan and I only had small pans about 1" high so I decided to bake the cake in a larger pan to compensate for the smaller height. I ended up baking the cake in a 10" round pan that was only 1" high. I probably should have used the same pan as I used for the other cakes though because the cake rose way higher than the edges. In fact, I thought for a few moments that the pan was going to overflow but luckily the edges were cooked just enough to keep the batter from overflowing. I also used a heating core in the cake so that may have helped stop it from overflowing.
So the final cake doesn't quite...look right. It didn't dome on top at all, and is very very flaky on top compared to the others and felt like it was falling apart as I was wrapping it up to put it into the freezer. I should have taken a photo but was a bit too concerned to remember!! In fact, I didn't remember to get ANY photos while making this cake!
So we'll have to see whether this cake turns out or not. It's the same recipe I used for last months baby cake so I know what the final result should be like so I'll have to take that into consideration when tasting it. However, I don't know if this cake would be the winner of the scratch-off anyway simply because of the slightly more complicated mixing process. It also ends up being pretty middle-of-the-road, cost-wise...
Cost:
So obviously the cake I made was quite cheap in comparison to the other recipes since I only made the 6" round, but I used the ingredient quantities provided on the site to calculate the cost of a cake the same size as the other recipes and it came up to $7.16AUD, putting it smack in the middle of the pricing test. To be honest, the taste would have to pretty much blow me away for me to prefer this recipe over the others simply because I thought the other recipes were simpler and more reliable. This recipe also used buttermilk which I don't ordinarily use, and it only used a very small amount of buttermilk which means the rest of the carton would go to waste. At least this would be true if I hadn't worked out how to freeze the rest of the buttermilk in ice cube trays so now I probably have enough buttermilk to last me the next 5 years (especially considering this was the first time I've ever bothered buying buttermilk!!).
Once again, no photos. I know. I suck.
Ok, so this cake was a bit more complicated than the other cakes. I mean, it wasn't hard, not even particularly time-consuming, but definitely not as straight forward as the other recipes.
The other recipes, I simply had to melt the chocolate/butter/liquid combo, wait for it to cool and add the flour/eggs/vanilla. Done. This one, I had to melt the chocolate/butter/liquid combo, wait for it to cool, sift the sugar into the already sifted flour combo, whisk the eggs/vanilla/buttermilk separately, stir the egg/vanilla/buttermilk mix into the flour/sugar combo, then add the melted chocolate mix in 3 separate batches.
One of my concerns with this recipe is that the sugar isn't required to be dissolved into the mixture at any point. When doing my research on mud cakes (because I research everything to death) I came across a few comments that one of the most important things with mud cakes is to ensure that the sugar is completely dissolved before baking. I don't know what the difference is but each of the other recipes instructed at some point to dissolve the sugar, whether it was with the chocolate/butter combo on the stove or after adding the sugar/butter combo to the flour.
Also, after I mixed everything together the batter seemed quite thick compared to the other batters which were very runny. It just didn't...seem quite the same as the other recipes at all.
The Exclusively Food website provides ingredient quantities for several different size pans. In cut back on costs I only made the smallest size they provided the quantities for, a 6" round. I have a 6" round pan but the recipe said to use a deep pan, generally a 3-4" high pan and I only had small pans about 1" high so I decided to bake the cake in a larger pan to compensate for the smaller height. I ended up baking the cake in a 10" round pan that was only 1" high. I probably should have used the same pan as I used for the other cakes though because the cake rose way higher than the edges. In fact, I thought for a few moments that the pan was going to overflow but luckily the edges were cooked just enough to keep the batter from overflowing. I also used a heating core in the cake so that may have helped stop it from overflowing.
So the final cake doesn't quite...look right. It didn't dome on top at all, and is very very flaky on top compared to the others and felt like it was falling apart as I was wrapping it up to put it into the freezer. I should have taken a photo but was a bit too concerned to remember!! In fact, I didn't remember to get ANY photos while making this cake!
So we'll have to see whether this cake turns out or not. It's the same recipe I used for last months baby cake so I know what the final result should be like so I'll have to take that into consideration when tasting it. However, I don't know if this cake would be the winner of the scratch-off anyway simply because of the slightly more complicated mixing process. It also ends up being pretty middle-of-the-road, cost-wise...
Cost:
So obviously the cake I made was quite cheap in comparison to the other recipes since I only made the 6" round, but I used the ingredient quantities provided on the site to calculate the cost of a cake the same size as the other recipes and it came up to $7.16AUD, putting it smack in the middle of the pricing test. To be honest, the taste would have to pretty much blow me away for me to prefer this recipe over the others simply because I thought the other recipes were simpler and more reliable. This recipe also used buttermilk which I don't ordinarily use, and it only used a very small amount of buttermilk which means the rest of the carton would go to waste. At least this would be true if I hadn't worked out how to freeze the rest of the buttermilk in ice cube trays so now I probably have enough buttermilk to last me the next 5 years (especially considering this was the first time I've ever bothered buying buttermilk!!).
Once again, no photos. I know. I suck.
Sunday, 5 May 2013
C.A.M - Mud Cake Scratch-Off - Australian Womens Weekly Mississippi Mud Cake
Ease of Making:
Once again, this cake was made nearly exactly the same as the previous two cakes, however the recipe said that the chocolate mixture needed to be cooled down nearly completely before adding the flour and eggs. Luckily it didn't take long at all for it to cool down, by the time I was finished measuring and sifting the flour and eggs etc the mix was basically cool enough to add straight away. I'm not sure why Bluehue's mix took so long to cool down in comparison to the rest of the recipes, perhaps I heated it up a lot more??? This mix probably only took about 15 minutes to cool nearly completely.


The other difference with this recipe was that it called for milk instead of the water that was used in the previous two recipes. We'll have to see how the taste changes with the milk instead of the water.
The cake didn't rise quite as much as the previous two cakes, however I used a heating core in the center while baking so not sure what difference that may have made. It also, like the other cakes, cracked dramatically on top.

Cost:
This cake came out being the 2nd most expensive cake behind Bluehue's cake. I calculated it to cost me $7.35AUD. I think this is largely because of the milk being used in place of water and it, like Bluehue's cake, called for nearly twice the amount of sugar as the rest of the recipes used.
Once again, this cake was made nearly exactly the same as the previous two cakes, however the recipe said that the chocolate mixture needed to be cooled down nearly completely before adding the flour and eggs. Luckily it didn't take long at all for it to cool down, by the time I was finished measuring and sifting the flour and eggs etc the mix was basically cool enough to add straight away. I'm not sure why Bluehue's mix took so long to cool down in comparison to the rest of the recipes, perhaps I heated it up a lot more??? This mix probably only took about 15 minutes to cool nearly completely.
The other difference with this recipe was that it called for milk instead of the water that was used in the previous two recipes. We'll have to see how the taste changes with the milk instead of the water.
The cake didn't rise quite as much as the previous two cakes, however I used a heating core in the center while baking so not sure what difference that may have made. It also, like the other cakes, cracked dramatically on top.
Cost:
This cake came out being the 2nd most expensive cake behind Bluehue's cake. I calculated it to cost me $7.35AUD. I think this is largely because of the milk being used in place of water and it, like Bluehue's cake, called for nearly twice the amount of sugar as the rest of the recipes used.
Saturday, 4 May 2013
C.A.M. - Mud Cake Scratch-Off - Pam's Chocolate Mud Cake
So I've just finished wrapping up Pam's mud cake and thought I'd write down my thoughts on the last 2 criteria before I forget!
Ease of Making:
The recipe for Pam's mud cake isn't much different from Bluehue's mud cake but I do think that Pam's mud cake is a bit easier to make, simply because I don't have to leave the chocolate mixture to cool down for as long.
Bluehue's recipe states to leave the chocolate mixture to cool to room temperature, which took about an hour and even then could probably have done with another half hour to cool.

Pam's recipe simply needs to be left for 15 minutes just so it's not boiling hot when the rest of the ingredients are added. This was the perfect amount of time for me to preheat the oven, measure out and sift the rest of the ingredients, beat the eggs, set up the KitchenAid and put everything away.
I do wonder whether the sugar would have been better off added in the beginning so it dissolves over the stove with the chocolate, butter etc. I don't know if it would make much of a difference which stage the sugar dissolves in but adding it in the beginning would save a minute or two.
The recipe stated it made enough for a double quantity of 20cm round pans. There ended up being a very similar amount of batter as Bluehue's recipe made, so I decided just to use 1 3" high 10" pan, same as I used for Bluehue's cake. I did however decide to use a greased flower nail as a heating core in the center of the pan to help prevent the big dome and to make sure it cooked evenly. I realised afterwards that using the flower nail may change the results so I'll continue using a heating core in the rest of the mud cakes and just try to take it into consideration with Bluehue's cake when tasting it later.
Cost:
So Pam's mud cake ended up being one of the cheapest mud cakes from the scratch-off. I calculated that it cost me $6.46AUD to make. It's only a couple of dollars difference though so it really just comes down to the taste.
I forgot to take any other photos while making Pam's mud cake, sorry! But the final cake rose nicely, it was mostly level on top due to using the heating core but could probably still do with being leveled off. It looks slightly darker than Bluehue's cake but I don't know if that's simply because I'm comparing after Bluehue's cake has been frozen. It looks about the same size as Bluehue's cake, it rose slightly higher but without the huge dome on top so it probably works out pretty evenly. It still cracked across the top but not as badly as Bluehue's one did. However, that's nothing against Bluehue's cake since it's a normal characteristic of a mud cake.
So into the freezer it goes...
Ease of Making:
The recipe for Pam's mud cake isn't much different from Bluehue's mud cake but I do think that Pam's mud cake is a bit easier to make, simply because I don't have to leave the chocolate mixture to cool down for as long.
Bluehue's recipe states to leave the chocolate mixture to cool to room temperature, which took about an hour and even then could probably have done with another half hour to cool.
Pam's recipe simply needs to be left for 15 minutes just so it's not boiling hot when the rest of the ingredients are added. This was the perfect amount of time for me to preheat the oven, measure out and sift the rest of the ingredients, beat the eggs, set up the KitchenAid and put everything away.
I do wonder whether the sugar would have been better off added in the beginning so it dissolves over the stove with the chocolate, butter etc. I don't know if it would make much of a difference which stage the sugar dissolves in but adding it in the beginning would save a minute or two.
The recipe stated it made enough for a double quantity of 20cm round pans. There ended up being a very similar amount of batter as Bluehue's recipe made, so I decided just to use 1 3" high 10" pan, same as I used for Bluehue's cake. I did however decide to use a greased flower nail as a heating core in the center of the pan to help prevent the big dome and to make sure it cooked evenly. I realised afterwards that using the flower nail may change the results so I'll continue using a heating core in the rest of the mud cakes and just try to take it into consideration with Bluehue's cake when tasting it later.
Cost:
So Pam's mud cake ended up being one of the cheapest mud cakes from the scratch-off. I calculated that it cost me $6.46AUD to make. It's only a couple of dollars difference though so it really just comes down to the taste.
I forgot to take any other photos while making Pam's mud cake, sorry! But the final cake rose nicely, it was mostly level on top due to using the heating core but could probably still do with being leveled off. It looks slightly darker than Bluehue's cake but I don't know if that's simply because I'm comparing after Bluehue's cake has been frozen. It looks about the same size as Bluehue's cake, it rose slightly higher but without the huge dome on top so it probably works out pretty evenly. It still cracked across the top but not as badly as Bluehue's one did. However, that's nothing against Bluehue's cake since it's a normal characteristic of a mud cake.
So into the freezer it goes...
Friday, 3 May 2013
C.A.M - Mud Cake Scratch-Off - Bluehue's Chocolate Mud Cake
So as I sit here typing this I can smell Bluehue's awesome mud cake baking in my oven. Obviously I can't compare the first 3 criteria yet (Flavor, Texture/Crumb & Moistness) but I can definitely talk about the last 2 criteria: Ease of Making & Cost.
Ease of Making:
Well this is definitely far easier than your usual white or yellow cake. You start out by heating the chocolate, butter, coconut milk, sugar, and instant coffee in one pot on the stove till it's all melted together then leave it to cool to room temperature.
 |
| Mmmm melted chocolate... |
While that was cooling I then sifted all the dry ingredients together, measured out my vanilla and put that to the side with the 2 eggs to add later. All of this probably only took me a few minutes, after which I went to tend to the kids while waiting for the chocolate mixture to finish cooling down.
I gave it about an hour before I went ahead to the next step which is basically just mixing everything together. The chocolate mixture was still a bit warm, I probably could have left it for another half hour but I'm impatient, lol!
 |
| All the waiting ingredients |

I poured the mixture into a 10" round pan - here's where I started to have a little bit of confusion. See, normally you need to grease or flour your cake pans - even if using baking paper you normally still grease the pan - but the recipe only stated to line the pan with baking paper. I didn't want to risk having the cake stick so I decided to grease the pan anyway. The recipe also didn't state what size pan to use but it looked like a lot of batter so I decided to go with the 10" pan since I don't have anything bigger. Once I put the mixture into the pan it still looked like a lot - like perhaps it could have made 2 cakes. Then I noticed that in a couple of spots the recipe refers to tinS but in other spots it only refers to 1 tin, so I don't know if the quantities in the recipe are actually for 2 cakes or 1. I crossed my fingers and went with 1.
Cost:
So I worked out the costing for each of the cakes based on the pricing of the brands/products I normally purchase from my local supermarket. Everyone's costing would be different based on local pricing or preferred products. I calculated that Bluehue's chocolate mud cake cost me $8.82AUD to make, which is the more expensive cake out of all of the ones I'm making for the scratch-off. However, it's only a difference of $1-2 so the taste may more than make up for that.
Using the coconut milk is what makes it more expensive since most of the other products can be bought in bulk and it's only a small percentage that gets used as opposed to the coconut milk which gets used nearly completely in just one cake. It also has nearly twice the amount of caster sugar as the other recipes with the exception of the AWW Mississippi Mud Cake which has the same amount. Caster sugar is quite expensive locally since the largest pack I can find around here is 1kg which only makes 2-3 cakes.
However you need to take into account that the recipes from the scratch-off don't all make the same size cake. The recipe I'll be using from Exclusively Foods makes a 16cm/6" round cake, the AWW Mississippi Mud Cake makes a 22cm/8.5" round, and Pam's Mud Cake makes a 20cm/8" round, and Bluehue's Mud Cake made a 10" round. The $1-2 difference probably works itself out in the end anyway once the size difference is taken into account.
For anyone interested in knowing how to work out the costing, I may do a post on how I work it out further down the track.
Update:
So the cake finished baking after 1 hour, 45 minutes and smelt awesome. I couldn't resist eating a bit of the crust which tasted great but obviously the cake will taste much better after being allowed to set up for a few days and being frozen to improve the flavor. It had quite a large dome and cracked along the top which I understand is pretty common when making mud cakes. I'll bake the rest of the scratch-off cakes the same way but in the future when making mud cakes I think I'll use a foil tent over the cake while baking, even baking strips around the pan, and possibly put a pan of water in the oven while baking to prevent such a large dome and the cracking across the top.
Using just 1 pan worked out fine, the cake baked right to the top of my 3" high pan and the dome rose probably about an inch above that. Perfect height for torting into 3 layers.
Saturday, 6 April 2013
C.A.M. - Mud Cake Scratch-Off

So for this months cake I've decided to go back to basics. Instead of making a fancy layered cake I'm going to test a few different mud cake recipes and have my family sample each of the cakes and pick the one we like the most. It's one thing to have a cake that looks nice but it needs to taste fantastic too! Eventually I'd like to make different variations on my mud cake recipe, adding different liqueurs, flavorings, nuts etc, but I need the perfect base recipe first.
So there are some mud cake recipes that I've heard several people mentioning on the Cake Central forums that I'd like to test out. I've also found a couple of recipes by Googling that have great reviews. So the recipes I've narrowed down to as contestants in my mud cake scratch off are as follows:
Bluehue's chocolate mud cake (can be found on the Cake Central forums)
Pams chocolate mud cake
Australian Women's Weekly Mississippi mud cake
Best Recipe's best reviewed mud cake
Exclusively Foods chocolate mud cake (this is the recipe I used for last months cake)
I'll be judging the cakes based on the following criteria:
1. Flavor
2. Texture/Crumb
3. Moistness
4. Ease of recipe
5. Cost
I will also be preparing each of these cakes exactly the way I would as if I were using them for a fondant covered layer cake. That means that after they've been baked and cooled I'll wrap them in glad wrap and freeze them for a week, then allow them to defrost overnight in the fridge before serving them.
Also, as a side note I should mention that if you're ever going to bake mud cakes to never eat them on the day they've been baked, mud cakes are best at least 3 days after they've been made.
Edit: I also want to add that freezing mud cakes before you defrost and serve them actually improves the flavor!!
I love mud cakes, although I've discovered that they seem to be predominately used in the Australian baking industry. Here in Australia most weddings you go to will have a mud cake as the wedding cake. They're wonderfully rich, and moist, last a very long time, take to freezing extremely well and have a delicious dense, nearly fudge-like, texture. They tend to remind me more of a large brownie than your traditional cake. They're perfect for covering with fondant as they're heavy enough to take the extra weight and can be flavored pretty easily. After using mud cakes for the last couple of my cakes I've decided to stick with mud cakes from here on unless I'm specifically asked to make a different type of cake for someone.
Z's 1st birthday is coming up in about 1 and a half months so I'm also making plans for that. I've already designed the birthday cake and made plans for all the birthday decorations to make so as I make the decorations I'll continue to post for those of you interested in any tutorials.
Sunday, 17 March 2013
C.A.M. - March Cake

I used the Exclusively Foods chocolate mud cake recipe, layered with a milk chocolate ganache and Orchard brand fondant. I added texture to several of the pieces such as the grass, turtle shells and tree trunk using Fiskar's texture plates and added the stitching detail with the end of a toothpick (I used one of those fondant embossing tools for most of the large leaves but decided I preferred the look from the toothpick).
It's funny but looking at this photo I can't see anything I'm really unhappy with BUT when I was putting this cake together I was nearly in tears because I was convinced it was an utter failure! First of all, I had trouble putting the fondant on the cake. The cake is just over 6" tall and it was the first time I had ever covered such a tall cake. DH was also trying to 'help' me and getting in my way so I was getting quite frustrated with him!
I had a couple of little tears in the fondant which I was able to cover up with the decorations and DH moved the fondant as I was rolling it out over the cake and I ended up with not enough on that side! Needless to say I was pretty angry with him about that but I was able to cover it up again. I read something recently saying that the difference between a professional cake decorator and an amateur is that the professional knows how to cover up their mistakes. Well, if that's true then maybe I should open a business because you can't see most of my mistakes lol!!
I had made the decorations for the cake all in advance but unfortunately I hadn't stored the turtles properly so they had dried out a bit too much by the time I went to put them on the cake and I ended up breaking both of them in 1-2 spots :( I was able to join them back together to put on the cake but you can still see the spots where they broke.

No, my cake isn't crooked (trust me, I used my spirit level while making it lol!), but my cake stand is!
You can see quite easily in this picture that my fondant was far from perfect. Also, the grass border didn't line up properly under the tree trunk.
Despite all the problems I'm still pretty happy in the end. I don't know if I would be happy selling this cake to a customer without a huge discount, BUT the cake tasted lovely, it didn't fall apart, and most of it looks great. Just have to work more on covering the cake with fondant and not let my decorations dry out too much before putting on the cake.
Monday, 11 March 2013
C.A.M - March Cake Critters
So I've spent all day today and yesterday making most of the little details to go on my March cake (yes, yes I know that's an awfully long time BUT I do have a 3 year old and 9 month old!!) and thought I'd write a post on how I made the detail parts.


I searched Google for a simple turtle design and found one on My Ceramics which was perfect for the job. I printed out the image in two different sizes, and cut out the head, body and feet in one section, then the shell in a second cutout. I covered the pieces of paper in shortening, then laid them down on the fondant and cut out around the templates.
I found it much easier to do this on top of a piece of parchment paper so that when I went to move the piece it didn't stretch out of shape.
When making the green fondant for the body my DH stepped in and insisted I leave the color marbled, he thought it would look really cool like that. You can't really see the marbling in the photos though. I'm not sure how I feel about it in the end, not sure whether it looks marbled or just like I didn't finish mixing it!!
As with the leaves, I went over the turtles with the end of a toothpick to make the stitching edge.

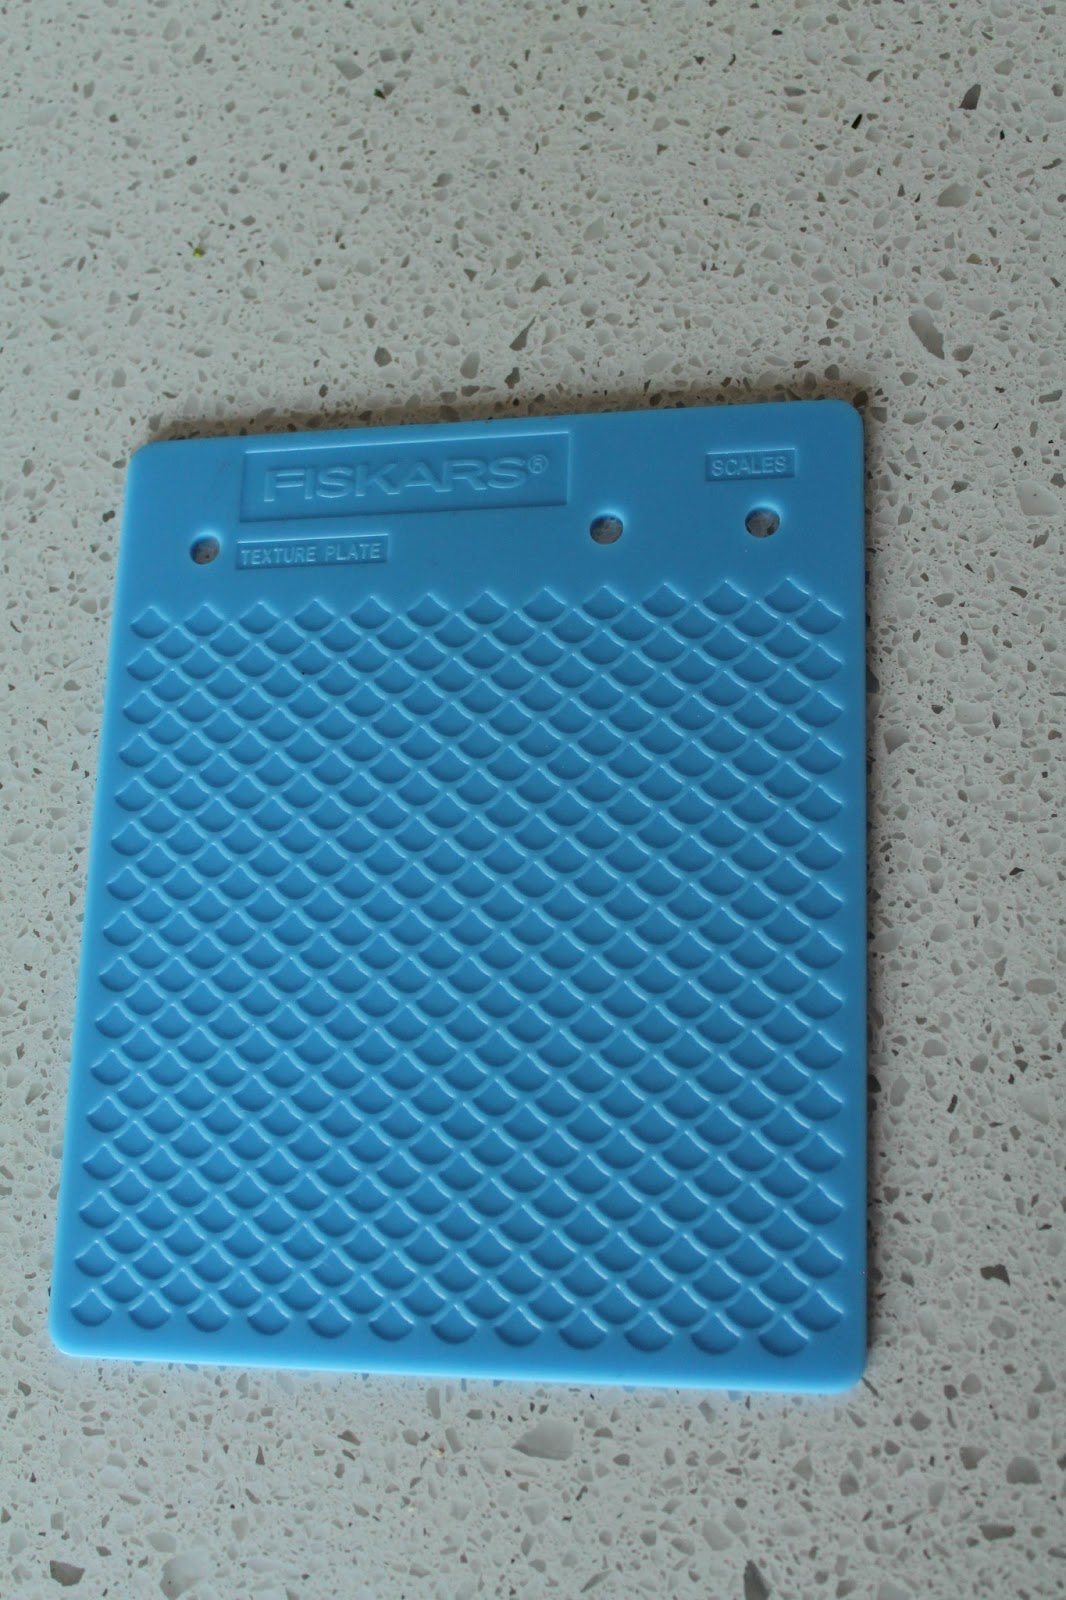
I was intending on putting blue spots on the shell like I'd seen a few others do with their turtles, but while putting away some of my tools into my cake supply drawer I found these Fiskar texture plates I had stashed away. They'd been given to me ages ago and I'd never had a use for them but I saw this scale one and immediately thought they would be perfect for the shells. I decided to use the texture plate upside down though so that they didn't resemble fish scales too much. I think it worked perfectly!! I have a whole bunch of these Fiskar texture plates so I'm intending on using them a lot more from now on!
After taking these photos I added the eyes and mouth onto the turtles.


The next step was to make the owls for the top of the cake. I want the owls to be sitting on the top of the cake, not lying down flat. Originally I was going to follow this tutorial from Bakingdom but I couldn't get it to work for me at all and grew very frustrated halfway through and scrapped the idea!!

I ended up rolling out my fondant (I mixed about 1/4 teaspoon of tylose powder through the fondant to make it firmer) about 1cm thick, and cut out my shape with the largest petal in my Ateco 6 piece set, then used the 2nd smallest cutter to cut the curve at the top of the head leaving the ear shapes behind (does that make sense?? Next time I'll take lots of photos, I promise!!).
I used the bottom half of a piping tip to make the feathering detail, and the bottom half of a very small piping tip for the baby owl. I used the black Americolor gourmet writer to draw on the eyes and eyelashes.
 I had made the owls the day before the rest of the details and had forgotten to put the stitching detail on. After I'd finished all the other items today I pulled out the owls and added on the stitching. I think it would have looked better if I'd done it on the same day, the stitching just doesn't look...right.. :/ I stuck toothpicks halfway through the bottom of the owls so that I can 'stick' them into the cake. They've already firmed up quite well, I think (I hope...) that they'll stand up quite well on the top of the cake.

The next step will be to make the grass border for the bottom of the cake, the tree trunk to go on the side, a branch for the owls to be sitting on and cut out the message for the top of the cake.
I also made the cakes over the weekend: a chocolate mud cake from Exclusively Foods (mud cakes are best made about a week before being eaten). I was going to stack the layers today but realized I'd forgotten to buy the cream to make the ganache!
I used the Wilton fondant leaf cutters to cut out all the leaves. For the larger leaves I used my fondant embossing tool for the stitching detail, for the smaller leaves I used the end of a toothpick.
I searched Google for a simple turtle design and found one on My Ceramics which was perfect for the job. I printed out the image in two different sizes, and cut out the head, body and feet in one section, then the shell in a second cutout. I covered the pieces of paper in shortening, then laid them down on the fondant and cut out around the templates.
I found it much easier to do this on top of a piece of parchment paper so that when I went to move the piece it didn't stretch out of shape.
When making the green fondant for the body my DH stepped in and insisted I leave the color marbled, he thought it would look really cool like that. You can't really see the marbling in the photos though. I'm not sure how I feel about it in the end, not sure whether it looks marbled or just like I didn't finish mixing it!!
As with the leaves, I went over the turtles with the end of a toothpick to make the stitching edge.
I was intending on putting blue spots on the shell like I'd seen a few others do with their turtles, but while putting away some of my tools into my cake supply drawer I found these Fiskar texture plates I had stashed away. They'd been given to me ages ago and I'd never had a use for them but I saw this scale one and immediately thought they would be perfect for the shells. I decided to use the texture plate upside down though so that they didn't resemble fish scales too much. I think it worked perfectly!! I have a whole bunch of these Fiskar texture plates so I'm intending on using them a lot more from now on!
After taking these photos I added the eyes and mouth onto the turtles.
The next step was to make the owls for the top of the cake. I want the owls to be sitting on the top of the cake, not lying down flat. Originally I was going to follow this tutorial from Bakingdom but I couldn't get it to work for me at all and grew very frustrated halfway through and scrapped the idea!!
I ended up rolling out my fondant (I mixed about 1/4 teaspoon of tylose powder through the fondant to make it firmer) about 1cm thick, and cut out my shape with the largest petal in my Ateco 6 piece set, then used the 2nd smallest cutter to cut the curve at the top of the head leaving the ear shapes behind (does that make sense?? Next time I'll take lots of photos, I promise!!).
I used the bottom half of a piping tip to make the feathering detail, and the bottom half of a very small piping tip for the baby owl. I used the black Americolor gourmet writer to draw on the eyes and eyelashes.
I made a simple 'glue' out of sugar and hot water to stick all the details onto the animals.
The next step will be to make the grass border for the bottom of the cake, the tree trunk to go on the side, a branch for the owls to be sitting on and cut out the message for the top of the cake.
I also made the cakes over the weekend: a chocolate mud cake from Exclusively Foods (mud cakes are best made about a week before being eaten). I was going to stack the layers today but realized I'd forgotten to buy the cream to make the ganache!
Monday, 18 February 2013
C.A.M. - February Cake

For my February cake I wanted to make a cake for Valentines Day. I looked online for inspiration and found lots of cheesy heart shaped cakes covered in hearts and roses but they all basically looked like a greeting card spewed onto a cake. I'm not really into that style of cake at all so I really didn't want to make one like that. Then when I was browsing Cake Central, I came across this ruffled petal layer cake from ChrisJack1.

I love the design of this cake, and it looked simple enough to recreate. However, I wanted the cake to have more of a Valentines Day feel to it, so I decided to make the petals a wine/rose red shade. I also decided to make a rose to go on the side instead of the flower shown on ChrisJack1's cake.
Then I decided to jump on the ombre bandwagon and have the petals go lighter as they went up the cake. I also wanted to make the inside cakes ombre as well BUT while I was baking them I completely forgot and didn't add the food coloring lol!
For some reason I'm not a huge fan of fondant ribbon's on cake, they just don't have enough detail for my liking so I ended up using a satin ribbon instead.
DH ordered a white chocolate mud cake to go under the fondant and since I was making the cake for him for V-Day I gave in and hunted for a white chocolate mud cake recipe. I'd heard a lot about how good the mud cakes recipes are from Exclusively Food, so I searched their site for a white chocolate mud cake and found this one.

I made 4 layers of Exclusively Foods white chocolate mud cake but had a little bit of trouble with my oven. We recently got a new fan-forced oven but I feel as though it runs about 10 degrees hotter than it should! I've found that I always need to reduce the temperature by at least 10 degrees and bake items for the minimum suggested cooking time. I know that you normally reduce the temperature for fan forced ovens anyway BUT I still have to reduce it from the suggested temperatures for fan forced ovens??? Very frustrating!
The recipe stated to bake at 160 (145 for a fan-forced oven) for 1 hour 10 minutes to 1 hour 20 minutes. I reduced my oven to 135 and put the first two layers in for 1 hour 10 minutes and they still came out quite dark! Luckily the inside seemed fine so I just cut off the dark bits when torting the layers. I'm going to buy an oven thermometer so I can keep a better eye on the temp of my oven :(
I also made a white chocolate sour cream ganache, using the Exclusively Foods recipe (recipe for the ganache is under the recipe for the white choc mud cake) and used that to fill the layers and dirty ice the cake.
I used Orchard brand white fondant to cover the cake and Bakels Pettinice pre-made red fondant to make the petals. I was very apprehensive about getting the dark red colors; I did a lot of Googling to find out how to achieve it and most people seemed to agree that it was extremely difficult to get that dark wine shade. Putting together a few of the most common suggestions I ended up having no trouble achieving the right shades.
 |
| You'll have to pardon the graininess of these photos - I had my ISO set way too high! Oops! |
To get the dark shades of red I added Americolor chocolate brown gel coloring and a touch of Americolor super black to get the darkest shade. The black gave it that real dark, burgundy shade that I was hoping for. To get the lightest shade of red I mixed white fondant with the red. I didn't actually end up using the super red gel coloring but had it on standby just in case.

I probably should have made the second lightest color slightly darker and probably should have mixed a little more white fondant through the lightest shade BUT I was lazy and gave up lol!

I used the Pettinice red fondant without any changes to make the rose for the cake.
The cake turned out perfectly, it stayed nice and moist under the fondant, the sour cream ganache helped cut through the sweetness a bit (although it was still super sweet - thinking of maybe cutting back on the sugar a bit next time!), I had NO issues with bulging this time (YAY!! I think it was probably because I used only ganache for filling and dirty icing and stuck to a mud cake which is quite dense), and I had no problems with covering the cake with fondant.


Criticisms:
The ribbon is crooked. I know. Just pretend you don't notice it and we'll all be happy. I also forgot to defrost the royal icing so I could 'glue' the ribbon and rose on, so I ended up having to use some pretty quilting pins I'd bought a few days ago. Since we were eating it at home I didn't really mind but I would NOT suggest doing this if you were giving it to others!!
The cake was really sweet. As I said, I think I'll cut down on the sugar next time.
The cake wasn't really high enough for all 4 layers of petals, which is why I placed the bottom layer so they lay on the cake stand. I really wanted to include all 4 layers for the ombre effect and still keep the ribbon, this was the only way I could see to fit them all on.
It would have been a bit prettier if I'd lifted the petals a bit before they had a chance to dry. By the time I remembered to do this they had already dried too hard.
I probably should have made the second lightest red petals slightly darker and the lightest ones slightly lighter. The two shades are too similar for my liking.

All in all I'm actually really really happy with how this cake turned out. Even with the few criticisms I listed above I wouldn't hesitate to make this again for a customer.

For next months cake I'm thinking of doing a new baby cake in honor of my baby nephew who is due on the 21st of March. Stay tuned to see how I go!!
Sunday, 20 January 2013
C.A.M - Looking Back at the January Cake
Ok, so now that I've finished making the January cake and also eaten part of it I can start going over some of the mistakes I think I made and things I will do differently first time around.
So in my post from yesterday I showed pictures of the cake once I had finished decorating it. After writing that post I went out to see a movie with DH for his birthday and do some shopping, and when we came home 5 hours later disaster had struck. Once again my cake was afflicted with the battle of the bulge. This time was far worse than last months episode, the flowers had sunk down into the cake, it was bulging and rippling all over the sides, it basically looked like it had melted :(
Unfortunately I didn't take any photos (well I avoided taking any photos because I'm too embarrassed!) but I think I know where I went wrong and what to do next time. For starters, I don't think I'll use lemon curd in my fondant covered cakes again. I think it's just too wet, the very middle of the cake got soggy from soaking up the lemon curd which I think is the reason that the top of the cake sank. I think the cake's sinking let too much air escape which caused a lot of the rippling and bulging. It didn't seem to be so much from the dam not being stiff enough as that looks like one of the few areas where the cake actually held up. (Although next time around I'm still going to try an even stiffer dam!!)
I also don't think that I'll freeze my cakes before filling and stacking them again, next time I think I'll let them cool, put them in the fridge overnight, then level, fill and stack them the next day. Once that's all done I can put it in the freezer, but not before. From what I've read, this somehow has to do with the bulge occuring.
Another thing I'll do next time is compress each layer as I stack them. I've read online from other bakers who press a cake board down on each layer before placing the next layer on top, so they compress the cake and squeeze out the air as they go.
I don't know what more to say, I'm very disappointed by the cake bulging (again!), although I know I should be really proud of what I achieved considering it's only my 2nd fondant covered cake. I think I would feel a lot better about it if my in-laws hadn't seen it! They're pretty much like the perfect family so I always feel very inadequate compared to them; my whole life lately seems to revolve around being who I think they want me to be and constantly feeling like a failure. *Sigh* But that's a whole other post for another day!!! Lol!
So in my post from yesterday I showed pictures of the cake once I had finished decorating it. After writing that post I went out to see a movie with DH for his birthday and do some shopping, and when we came home 5 hours later disaster had struck. Once again my cake was afflicted with the battle of the bulge. This time was far worse than last months episode, the flowers had sunk down into the cake, it was bulging and rippling all over the sides, it basically looked like it had melted :(
Unfortunately I didn't take any photos (well I avoided taking any photos because I'm too embarrassed!) but I think I know where I went wrong and what to do next time. For starters, I don't think I'll use lemon curd in my fondant covered cakes again. I think it's just too wet, the very middle of the cake got soggy from soaking up the lemon curd which I think is the reason that the top of the cake sank. I think the cake's sinking let too much air escape which caused a lot of the rippling and bulging. It didn't seem to be so much from the dam not being stiff enough as that looks like one of the few areas where the cake actually held up. (Although next time around I'm still going to try an even stiffer dam!!)
I also don't think that I'll freeze my cakes before filling and stacking them again, next time I think I'll let them cool, put them in the fridge overnight, then level, fill and stack them the next day. Once that's all done I can put it in the freezer, but not before. From what I've read, this somehow has to do with the bulge occuring.
Another thing I'll do next time is compress each layer as I stack them. I've read online from other bakers who press a cake board down on each layer before placing the next layer on top, so they compress the cake and squeeze out the air as they go.
I don't know what more to say, I'm very disappointed by the cake bulging (again!), although I know I should be really proud of what I achieved considering it's only my 2nd fondant covered cake. I think I would feel a lot better about it if my in-laws hadn't seen it! They're pretty much like the perfect family so I always feel very inadequate compared to them; my whole life lately seems to revolve around being who I think they want me to be and constantly feeling like a failure. *Sigh* But that's a whole other post for another day!!! Lol!
Cake-A-Month - Finished January Cake
So here's the final reveal of the January cake: a coconut cake layered with lemon curd and frosted with lemon Swiss Meringue Butter Cream, covered in fondant and decorated with gumpaste flowers.
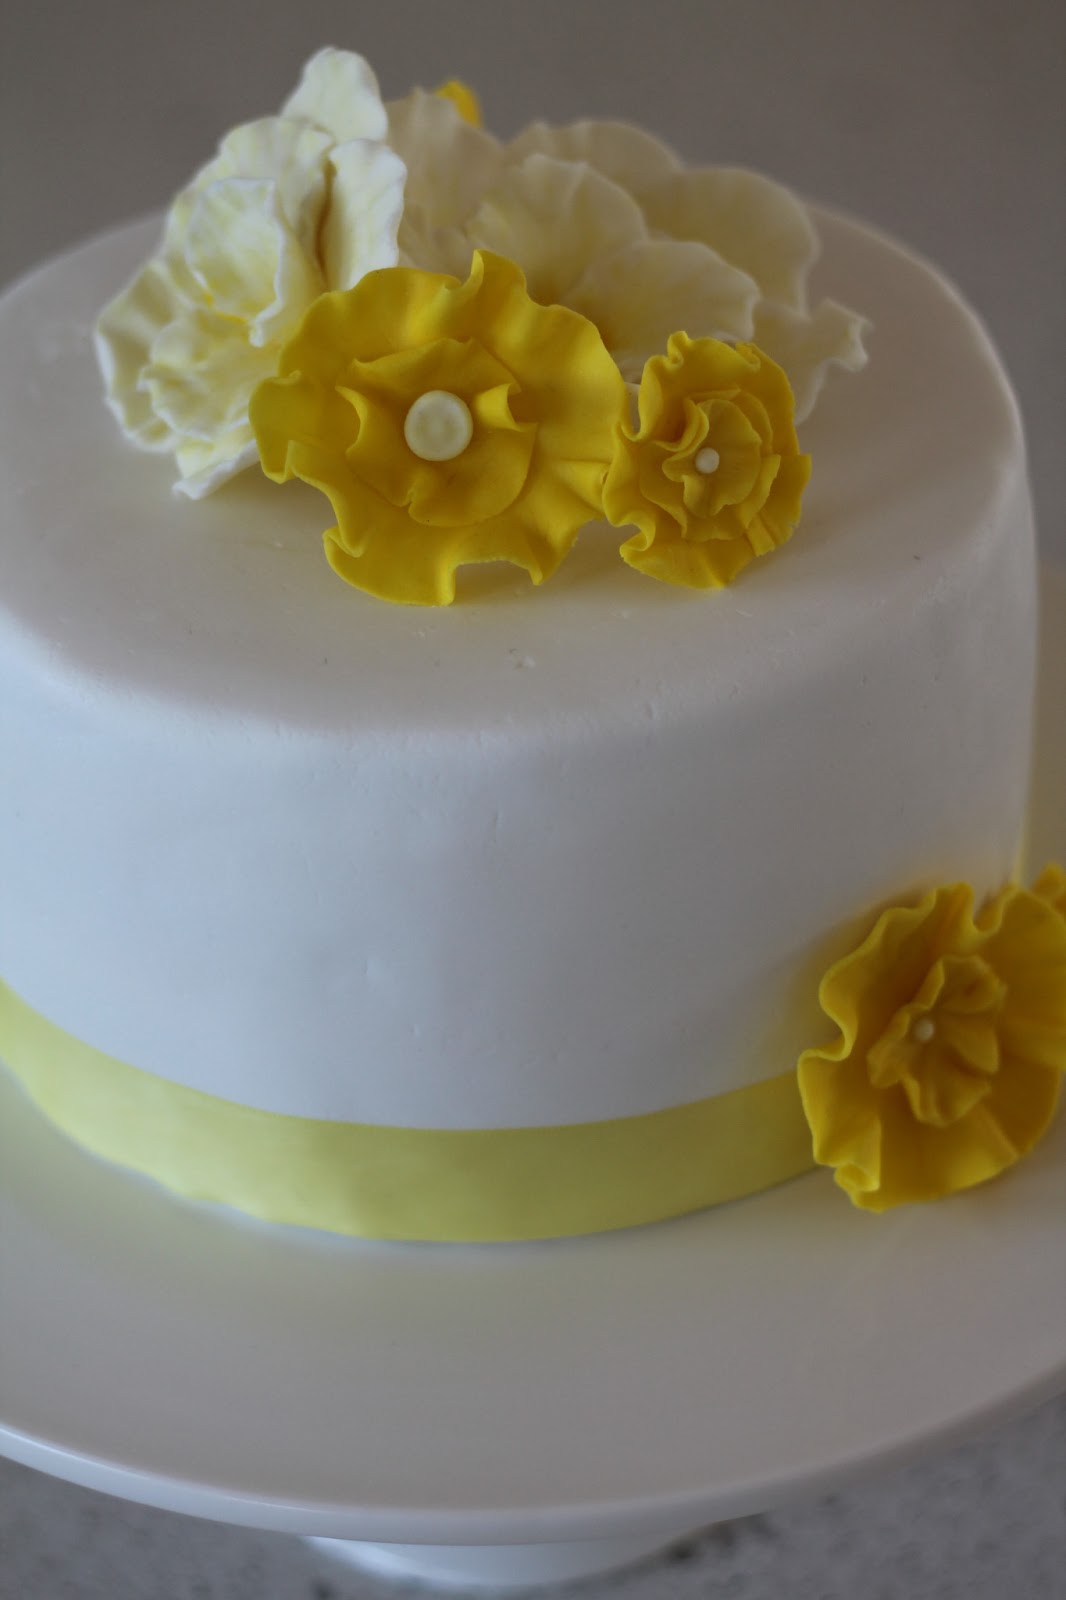
I was actually really surprised at how easy it was to do the fondant this time. I did a few little things differently this time, not exactly sure which thing made the biggest change. For starters I used a different brand of fondant this time. I was going to buy the Satin Ice fondant like I used last time, but my regular supplier was out of the Satin Ice and sent me Orchard brand fondant instead. I was pretty annoyed about this and worried about using the different brand, but the fondant was extremely pliable and soft, didn't get sticky and was very easy to smooth. With last months cake I had colored the fondant with gel food coloring, whereas this time I left it white, so I don't know what difference that made to the workability of the fondant (is workability a word?? Well it is now anyway!)

Last time, I used powdered sugar to stop the fondant from sticking, and then started using shortening when the fondant began cracking. This time however, I only used shortening and had some powdered sugar on standby in case the fondant got too sticky, which it didn't!
And I think the biggest difference was the weather! You may recall me saying that the weather when I was doing the Christmas cake was stinking hot, well I was extremely lucky this time around and the one day I was working with the fondant the weather dropped by like, 10 degrees!
So you can see that after I made two of the rose-style flowers I gave up and made some simple ruffled circle flowers to go with the cake. I got too frustrated with the rose style ones, and they took a lot of time (which I was very short of!) and patience (which I also lack lol!) to make, so I decided to start off testing my skill by doing the simpler flowers for the first couple of cakes before moving onto proper roses. Next time around I'll also color the gumpaste first rather than painting the final product and use luster powder to add dimension.
You can see that the fondant still isn't perfectly smooth, but I'm definitely getting better at it! Practice makes perfect right?
And it was way easy to put the ribbon border on, the hardest thing was lining it up properly so the bottom of the cake was entirely hidden. I don't think you can really see it in the photos but there are a couple of spots where about 3-4mm of cake are visible at the bottom of the border.
I would definitely make sure that next time I make the cake on a cake board, I didn't use one this time because I didn't think it would be necessary, but moving the cake around was a real pain in the butt. I couldn't make the cake on the cake stand because the cake stand wouldn't fit in my fridge so used a regular plate, but it was difficult to cover the cake in fondant on the plate because of the edges!
I have a really handy pizza lifter that I use for lifting and moving my cake layers, but I still had a bit of trouble moving it at the end, so I might buy some of those cheap bulk cake boards off eBay for next time.
So, I'm really, really happy with how the cake turned out and I'm now starting to think about next months cake - maybe a Valentines Day themed cake?? :)
Oh btw, Happy Birthday to my wonderful dear husband, who without a doubt, is the best thing to have ever happened to me - especially since he's given me two beautiful, happy boys!!! I love my family :)
I was actually really surprised at how easy it was to do the fondant this time. I did a few little things differently this time, not exactly sure which thing made the biggest change. For starters I used a different brand of fondant this time. I was going to buy the Satin Ice fondant like I used last time, but my regular supplier was out of the Satin Ice and sent me Orchard brand fondant instead. I was pretty annoyed about this and worried about using the different brand, but the fondant was extremely pliable and soft, didn't get sticky and was very easy to smooth. With last months cake I had colored the fondant with gel food coloring, whereas this time I left it white, so I don't know what difference that made to the workability of the fondant (is workability a word?? Well it is now anyway!)
Last time, I used powdered sugar to stop the fondant from sticking, and then started using shortening when the fondant began cracking. This time however, I only used shortening and had some powdered sugar on standby in case the fondant got too sticky, which it didn't!
And I think the biggest difference was the weather! You may recall me saying that the weather when I was doing the Christmas cake was stinking hot, well I was extremely lucky this time around and the one day I was working with the fondant the weather dropped by like, 10 degrees!
So you can see that after I made two of the rose-style flowers I gave up and made some simple ruffled circle flowers to go with the cake. I got too frustrated with the rose style ones, and they took a lot of time (which I was very short of!) and patience (which I also lack lol!) to make, so I decided to start off testing my skill by doing the simpler flowers for the first couple of cakes before moving onto proper roses. Next time around I'll also color the gumpaste first rather than painting the final product and use luster powder to add dimension.
You can see that the fondant still isn't perfectly smooth, but I'm definitely getting better at it! Practice makes perfect right?
And it was way easy to put the ribbon border on, the hardest thing was lining it up properly so the bottom of the cake was entirely hidden. I don't think you can really see it in the photos but there are a couple of spots where about 3-4mm of cake are visible at the bottom of the border.
I would definitely make sure that next time I make the cake on a cake board, I didn't use one this time because I didn't think it would be necessary, but moving the cake around was a real pain in the butt. I couldn't make the cake on the cake stand because the cake stand wouldn't fit in my fridge so used a regular plate, but it was difficult to cover the cake in fondant on the plate because of the edges!
I have a really handy pizza lifter that I use for lifting and moving my cake layers, but I still had a bit of trouble moving it at the end, so I might buy some of those cheap bulk cake boards off eBay for next time.
So, I'm really, really happy with how the cake turned out and I'm now starting to think about next months cake - maybe a Valentines Day themed cake?? :)
Oh btw, Happy Birthday to my wonderful dear husband, who without a doubt, is the best thing to have ever happened to me - especially since he's given me two beautiful, happy boys!!! I love my family :)
Friday, 18 January 2013
Cake-A-Month - January - Post 6
I've been spending a lot of time over the past few days making the gumpaste flowers for the cake and I've ran into so many problems. I have a big problem with trying out new things: I always want to be perfect, and when my first attempts are less than perfect I get frustrated, dispirited and often, give up. So when I started having problems with the flowers I was nearly ready to kick the bucket with the entire cake a month challenge and give up. But of course I didn't cos I knew I was acting worse than my 3 year old and had to get over myself :)
So a couple of posts back you would have seen my first attempt at gumpaste flowers, which I was quite happy with. I wasn't entirely happy with the structure of the flower though, so I decided to try out a different technique the next time around.
What I tried to do was start in at the middle of the flower (rather than starting with the bottom layer like I did for my first flower) and started by wrapping the inside petals around a toothpick, and gradually building on it with layers of petals. Sounds great huh? Well it didn't quite work out that way. The petals started sticking to everything BUT the other petals, they were drooping and falling off and I couldn't get them to look natural when I finally did get them to stick. I think I ended up throwing a tantrum my toddler would be envious of and threw the whole thing in the bin. Yeah, I'm THAT person :/
So I gave up with it for that day and sat on the computer looking at heaps of different tutorials. I began to realize that gumpaste flowers are a whole different ballpark unto themselves. There was no way in hell I was going to sit down and come up with flawless, beautiful flowers until I'd been practicing for a loooong time. I picked up a few little tidbits of info that have really helped me though:
1. The sugar glue isn't going to instantly 'glue' the pieces together. It's going to take time and I need to apply each petal individually and wait till that one is stable before moving onto the next. (Well the way I was building them it needed to be done that way anyway!)
2. Brushing the petals with the food coloring like I had been planning on doing just wasn't going to work that way. The lemon juice was making them dry super shiny and I'm not exactly an artist so I wasn't doing the worlds best painting job! A better technique would have been to color the gumpaste yellow, then use luster powder to add dimension and make the color appear more natural.
3. Trying to make the flowers by working on each petal and putting them together probably wasn't the best method to pick for my first attempt. I would have been better off starting with actual flower cutters, or large circles to make ruffled layer flowers.
4. Having the proper size/shape moulds for my flowers to dry in would have been a huge help.
So tonight I sat down and started playing around with the gumpaste again, using some of the techniques I'd learnt online. I decided not to pursue the elaborate flowers I was attempting before, while I had managed to produce one nice one the rest were just out of my skill and only succeeded in frustrating me.
Here are the flowers I ended up with:

Much simpler than the other ones I was doing, but probably more suited to a beginner like me :) And on the plus side, they're far less frustrating than the other ones LOL!
Anyway, just as I was starting to get the hang of it (and finally working out how to roll the gumpaste thin!), the stupid gumpaste tool I've been using to ruffle the edges broke!! :(
Luckily my very handy DH whipped out the superglue and fixed it up for me, but now I need to wait overnight for it to dry :(
While waiting I thought I'd try out my new letter press from Clikstix.

I was really looking forward to using this and being able to finish off the January cake with a happy birthday message to my hubby BUT I couldn't get the stupid things to work properly. I have no idea how people use these stupid things, you're supposed to brush your gumpaste with icing sugar to stop it from sticking, then simply press down on the gumpaste with the clikstix cutter, press down on the edges, lift it up and press down the ejector bit to eject the letter.
NOPE. It does NOT work like that. This is how it works:
1. Press the clikstix cutter down on the gumpaste and press the edges down.
2. Lift up the clikstix cutter and all of the gumpaste along with it.
3. Try to peel the excess gumpaste off without much luck.
4. Push down on the ejector to eject the letter. Watch in frustration as nothing ejects.
5. Get out a toothpick to dig the gumpaste out from the letter section.
6. Soak in water overnight to get rid of the gumpaste.
Anyone know how to use these stupid things???? If so, PLEASE TELL ME!!! Otherwise I'm giving up and buying the cookie cutter style ones on eBay!
So a couple of posts back you would have seen my first attempt at gumpaste flowers, which I was quite happy with. I wasn't entirely happy with the structure of the flower though, so I decided to try out a different technique the next time around.
What I tried to do was start in at the middle of the flower (rather than starting with the bottom layer like I did for my first flower) and started by wrapping the inside petals around a toothpick, and gradually building on it with layers of petals. Sounds great huh? Well it didn't quite work out that way. The petals started sticking to everything BUT the other petals, they were drooping and falling off and I couldn't get them to look natural when I finally did get them to stick. I think I ended up throwing a tantrum my toddler would be envious of and threw the whole thing in the bin. Yeah, I'm THAT person :/
So I gave up with it for that day and sat on the computer looking at heaps of different tutorials. I began to realize that gumpaste flowers are a whole different ballpark unto themselves. There was no way in hell I was going to sit down and come up with flawless, beautiful flowers until I'd been practicing for a loooong time. I picked up a few little tidbits of info that have really helped me though:
1. The sugar glue isn't going to instantly 'glue' the pieces together. It's going to take time and I need to apply each petal individually and wait till that one is stable before moving onto the next. (Well the way I was building them it needed to be done that way anyway!)
2. Brushing the petals with the food coloring like I had been planning on doing just wasn't going to work that way. The lemon juice was making them dry super shiny and I'm not exactly an artist so I wasn't doing the worlds best painting job! A better technique would have been to color the gumpaste yellow, then use luster powder to add dimension and make the color appear more natural.
3. Trying to make the flowers by working on each petal and putting them together probably wasn't the best method to pick for my first attempt. I would have been better off starting with actual flower cutters, or large circles to make ruffled layer flowers.
4. Having the proper size/shape moulds for my flowers to dry in would have been a huge help.
So tonight I sat down and started playing around with the gumpaste again, using some of the techniques I'd learnt online. I decided not to pursue the elaborate flowers I was attempting before, while I had managed to produce one nice one the rest were just out of my skill and only succeeded in frustrating me.
Here are the flowers I ended up with:
Much simpler than the other ones I was doing, but probably more suited to a beginner like me :) And on the plus side, they're far less frustrating than the other ones LOL!
Anyway, just as I was starting to get the hang of it (and finally working out how to roll the gumpaste thin!), the stupid gumpaste tool I've been using to ruffle the edges broke!! :(
Luckily my very handy DH whipped out the superglue and fixed it up for me, but now I need to wait overnight for it to dry :(
While waiting I thought I'd try out my new letter press from Clikstix.
I was really looking forward to using this and being able to finish off the January cake with a happy birthday message to my hubby BUT I couldn't get the stupid things to work properly. I have no idea how people use these stupid things, you're supposed to brush your gumpaste with icing sugar to stop it from sticking, then simply press down on the gumpaste with the clikstix cutter, press down on the edges, lift it up and press down the ejector bit to eject the letter.
NOPE. It does NOT work like that. This is how it works:
1. Press the clikstix cutter down on the gumpaste and press the edges down.
2. Lift up the clikstix cutter and all of the gumpaste along with it.
3. Try to peel the excess gumpaste off without much luck.
4. Push down on the ejector to eject the letter. Watch in frustration as nothing ejects.
5. Get out a toothpick to dig the gumpaste out from the letter section.
6. Soak in water overnight to get rid of the gumpaste.
Anyone know how to use these stupid things???? If so, PLEASE TELL ME!!! Otherwise I'm giving up and buying the cookie cutter style ones on eBay!
Tuesday, 15 January 2013
Cake-A-Month - January - Post 5
So today I made the Swiss Meringue Butter Cream for the January cake. For some reason I was incredibly nervous about making the SMBC. I'd read so much about how difficult it is to make, about people that had attempted it only to end up with a curdled mess that needed to be thrown out. I'd also read a lot about how it's a bit of an acquired taste since it's so incredibly different from the typical icing sugar-butter frosting that you'll find on most cakes.
I also knew it involved making a meringue, which I've never attempted before, and I'd also read a lot about meringues flopping due to a tiny bit of grease getting into the mixture or eggs being old etc. Long story short, I was incredibly nervous about this step of making the January cake.
I didn't need to be so nervous! I followed the instructions and guide from Sweetapolita and ended up with a beautiful glossy frosting! I had to continue whipping the frosting for about 10 minutes longer than she stated before it cooled down enough to add the butter, and I followed her instructions to make a lemon flavoured buttercream. I also halved her recipe since her recipe makes 10 cups and I definitely didn't need that much! I only needed the frosting to make the dams in each layer and dirty ice the cake, and the halved recipe was more than enough.

Once I had finished the SMBC I stacked and filled the layers for the cake. I had made four layers, and piped a stiff dam of SMBC around each before filling with a thin layer of the lemon curd I'd already made.

Once stacked and filled, I dirty iced the cake and put it in the fridge to settle.

I didn't get a photo of the cake once it had been dirty iced, sorry, I must have been distracted! I'll take a photo before I cover it in fondant in a couple of days :)
I also knew it involved making a meringue, which I've never attempted before, and I'd also read a lot about meringues flopping due to a tiny bit of grease getting into the mixture or eggs being old etc. Long story short, I was incredibly nervous about this step of making the January cake.
I didn't need to be so nervous! I followed the instructions and guide from Sweetapolita and ended up with a beautiful glossy frosting! I had to continue whipping the frosting for about 10 minutes longer than she stated before it cooled down enough to add the butter, and I followed her instructions to make a lemon flavoured buttercream. I also halved her recipe since her recipe makes 10 cups and I definitely didn't need that much! I only needed the frosting to make the dams in each layer and dirty ice the cake, and the halved recipe was more than enough.
Once I had finished the SMBC I stacked and filled the layers for the cake. I had made four layers, and piped a stiff dam of SMBC around each before filling with a thin layer of the lemon curd I'd already made.
Once stacked and filled, I dirty iced the cake and put it in the fridge to settle.
I didn't get a photo of the cake once it had been dirty iced, sorry, I must have been distracted! I'll take a photo before I cover it in fondant in a couple of days :)
Sunday, 13 January 2013
Cake-A-Month - January - Post 4
So I baked another batch of the coconut white cake from Beyond Buttercream. This time I doubled the recipe and made a couple of small tweaks - nothing major!
Last time I had put the equivalent of how much sour cream and milk were in the recipe which had come to approx. 450ml's if I recall correctly, however this time I just substituted 1x 400ml can of coconut milk per batch (so 2 cans for the doubled recipe). I also added more dessicated coconut (probably about one small handful extra). Also (and this probably sounds really obvious!) I added the coconut with the rest of the dry ingredients, whereas with the first batch I baked I had added it at the end where the recipe stated to add your flavourings.
So no major changes, although there was about 100ml less liquid in the end, and the cake turned out completely different! No problems with the batter being too runny this time, and the finished cake was light and fluffy inside instead of dense and moist. To be honest, I was slightly disappointed at the difference, along with my husband and in-laws who tasted the cake. We all agreed that while we could tell that the light and fluffy cake was what the end result was supposed to be, and probably what you would expect if buying a cake from a bakery, we all actually preferred the dense moist cake which had too much liquid. It seemed like...OH! I finally figured out what the texture of the other cake reminded me of! MUD CAKE! It reminded me of a white chocolate/coconut mud cake! Well, now maybe you can understand why we all really liked it LOL!
Well the final cakes (doubling the recipe made 5x 1" high 8" round cakes) tasted lovely, and would be perfectly fine if we hadn't tasted the mistake cakes of the day before! Now I think I'm going to have to go on a hunt for the perfect white chocolate mud cake recipe haha!
I then started experimenting with making the flowers for the cake. I had purchased 250gms of Cake Art's flower modelling paste (seems to me that it's simply gumpaste), a set of teardrop shaped cookie cutters and a set of fondant tools from eBay. I cut out a bunch of teardrops from thinly rolled gumpaste, used the ball tool to lightly ruffle the edges and glued them together with sugar syrup. I set the flowers in a small glass bowl overnight to dry.
 |
| Fantasy Ruffle Flower |
While I had a bit of time tonight I grabbed my new paint brush bought just for my cake decorating, and mixed a bit of yellow food coloring (I use Americolor gel colors) with lemon juice (I got this tip from Savannah Custom Cakes - check out their extremely informative videos on YouTube here!) and painted the center of the flower, lightly brushing the color out along the petals.
In hindsight, I should have painted each petal before building the flower, but I was mainly just testing at the time and didn't think ahead :)

I also made a batch of lemon curd today to go between the layers of the cake. I used the ingredients from this recipe for the lemon curd (except I used all egg yolks that I had leftover from baking the cake), but used the instructions from this recipe to make it in the microwave. Oh, and I ended up adding about 1/4C of extra sugar because I found the lemon curd slightly too tart for my taste. It worked well anyway and the final result was a really nice creamy lemon curd. I just worry that it may not be quite enough to fill the cakes!
Thursday, 10 January 2013
Cake-A-Month - January - Post 3
Fret not, I haven't forgotten you! I haven't quite gotten to that point where the posts slowly dwindle and die (give me another month for that to happen!). I haven't posted because so far, there's being nothing to post! I haven't been able to get started on January's cake because the weather has been absolutely terrible here! Here in Australia we've been going through one of the worst heatwaves in recorded history causing some of the worst bushfire conditions we've ever seen, suffice it to say I wasn't exactly thrilled at the idea of turning on the oven and heating the house up even more!! Working with fondant in this weather isn't exactly a welcome idea either!
So today was the first day with cooler weather and according to the weather forecasts it wasn't going to last for long so I quickly grabbed the chance to bake the cakes for the January cake.
I used Beyond Buttercream's white cake recipe, but made a coconut variation as per her instructions. I made a couple of variations though:
Instead of cake flour I used plain flour mixed with a couple of tablespoons of corn flour. Cake flour is quite hard to come by in Australia and when you do find it it's significantly more expensive than regular flour. According to Google using corn flour in plain flour is a popular substitute so I figured I'd go with that.
I used butter instead of shortening since it's also difficult to come by shortening in Australia. The only readily available shortening is made 100% from transfats and is pretty gross.
As per Beyond Buttercreams instructions for the coconut variation I substituted the milk and sour cream for coconut milk and added a handful of desiccated coconut.
When I was making the batter for the cake I was a bit worried. The batter was reeeeally runny, despite her instructions saying that the batter should be thickening up. The butter also wasn't completely mixing through. Her instructions said to add the liquid and butter all at once but the batter ended up too runny to properly mix the butter through. I felt like the sour cream shouldn't have been substituted for coconut milk since the liquid content of the two are drastically different. I went ahead with the recipe anyway and decided to see what happens.
 |
| Chunky, soup-like texture. |
While the cakes were baking I got even more worried. The cakes were rising strangely, one side would rise while the other side stayed at the same level, the top was bubbling away like it was boiling on the stove and was very crispy looking at the same time. It was very very odd looking and I sorta gave in to the fact that the cakes had failed and I would have to start over again.
 |
| The best of the 3 cakes. Crispy appearance to the top. |
Then when the cakes were finished and I went to turn them out onto cooling trays, something amazing happened.
While the tops of the cakes were all strange and crispy appearing, the bottoms of the cakes looked PERFECT! The texture seemed right, they were slightly golden in appearance and didn't seem any different from any other cake I would have baked. I then realised that the strange appearance of the tops were because all the desiccated coconut had risen to the top of the cake during the baking process. I still had to taste them though - just to test, of course!! ;)
 |
| Perfection! |
Mmmmm, these cakes are sooo good. I was a bit surprised at the inside texture of the cake, the inside is very moist and slightly...dense?? but in a really good way (I know it sounds totally weird!), sorta like the inside of brownies. I think it would actually work really well under fondant, it won't dry out like the Christmas cake did, and should be firm enough to hold up under the fondant. They actually reminded me a lot of the wedding cake at a friends wedding. We all really loved the cake and were eating it for weeks afterwards (they were living with us at the time) and we all commented on the strange but delicious texture of the cake - moist, but slightly fudge-like. Maybe the baker uses the same recipe?? Lol
I'm going to have to bake more tomorrow, I somehow ended up eating all of them in the testing process, woops! I'll let you know how tomorrows attempt goes :)
Thursday, 3 January 2013
Cake-A-Month - January - Post 2
Here's a mockup of the cake I want to make for January:

Wish me luck!
Monday, 31 December 2012
Cake-A-Month - January - Post 1
I'm really feeling over sickeningly sweet chocolate cakes after the Christmas cake, and ever since we came back from our holiday to Hawaii I've been obsessed with all things coconut. Then I saw this cake from The Cake Blog and I fell in love:
 |
| Isn't it just so fresh and summery looking? |
 |
| Fondant flower tutorial from unknown source - sorry! |
 |
| Fondant flower tutorial from Bronnie Bakes |
So what I've decided to do is use Beyond Buttercream's white cake recipe to make a single tier coconut cake, torted into 4 layers and filled with a lemon curd, and frosted with a lemon version of Sweetapolita's Swiss Meringue Buttercream, covered in fondant with a yellow satin ribbon border and 2-3 yellow fondant flowers. Phew! :)
Techniques I want to learn with this cake:
- A proper white cake recipe which can hopefully be the basis for many more cakes in the future.
- Making Swiss Meringue Buttercream
- Covering the cake with fondant
- Fondant flowers
- Using a ribbon border
- Getting a perfectly smooth buttercream frosted cake
Subscribe to:
Posts (Atom)