Showing posts with label My Cakes. Show all posts

Tuesday, 11 June 2013

My very first cake order!!

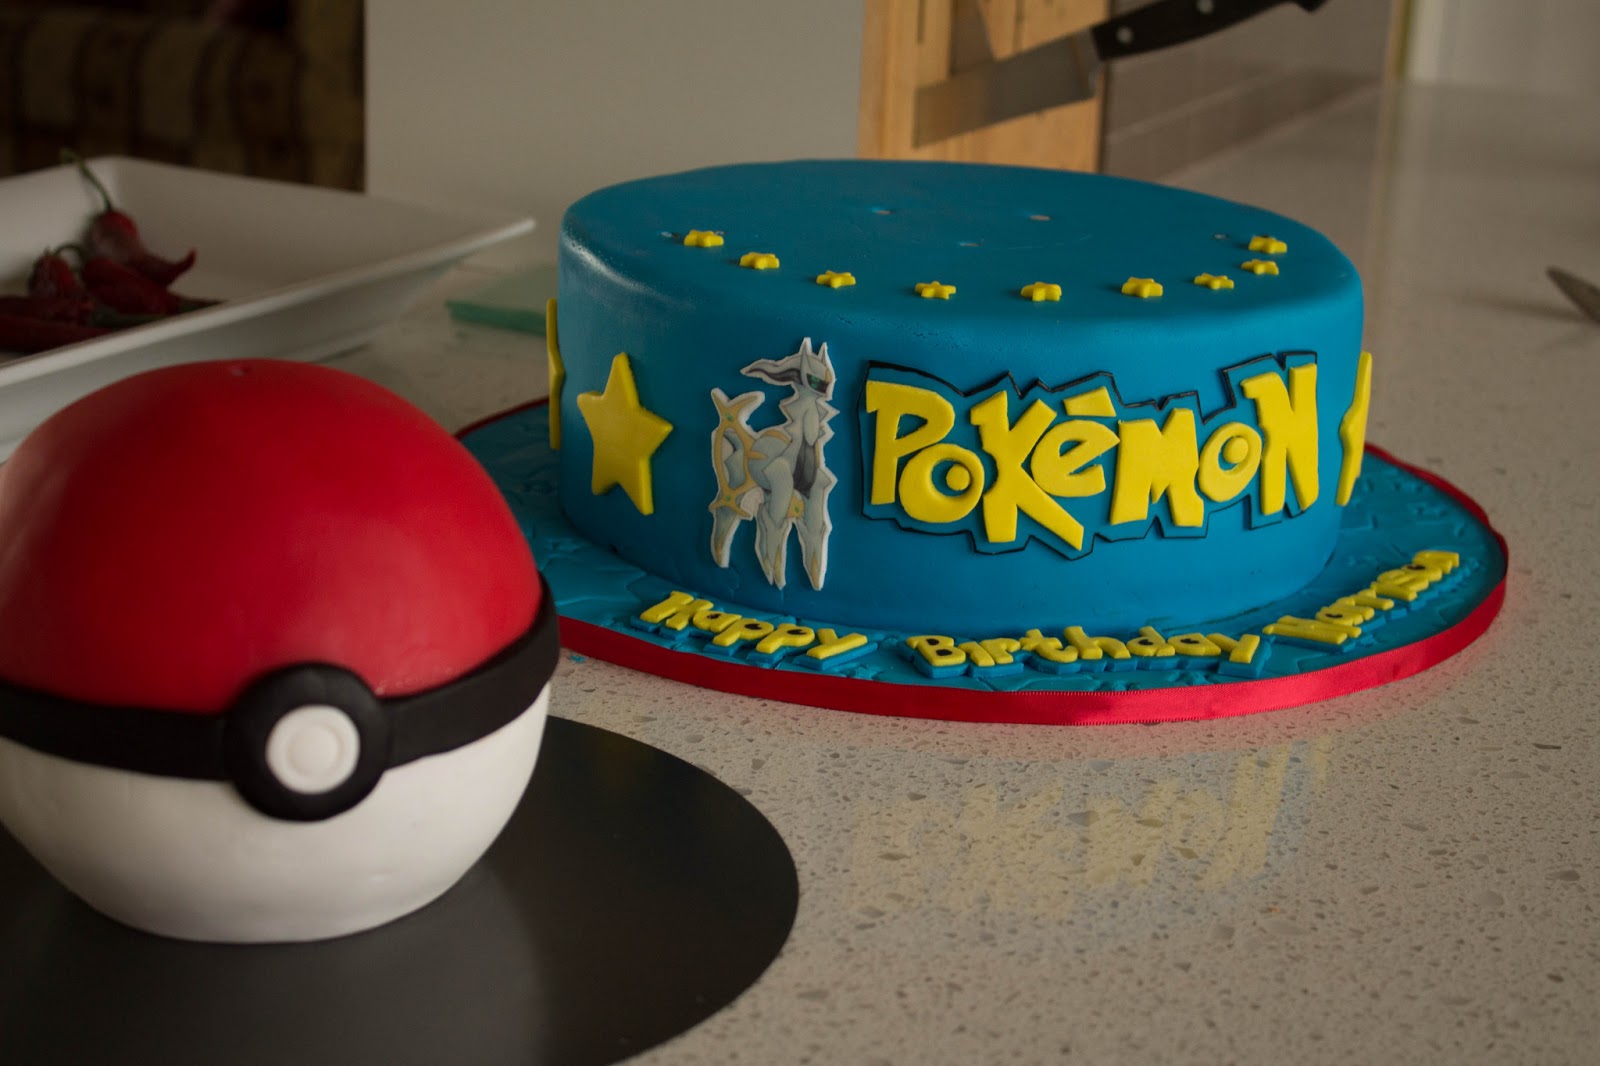
So one of my friends asked me to make a cake for her sons 9th birthday (yeah yeah I know it's not a real 'order' if it's coming from a friend - but I'm ignoring that fact lol!!). Apparently he's obsessed with Pokemon so naturally the cake was a Pokemon themed cake. His favorite character is Arceus, but after looking at how detailed Arceus is I decided to make life easier on myself by ordering an edible image to put on the side of the cake.

 The Pokeball was surprisingly easy to make. I ordered the Fat Daddio's 5" hemisphere pan. I was a little apprehensive about using it, when I looked online there were a lot of mixed reviews about it being difficult to use and the cake not cooking properly etc.
I took all the reviews on board and this is how I made the ball: First I used my chocolate cake recipe as a tester. I sprayed the pan well with cooking spray then used my silicone pastry brush to make sure the entire pan was evenly covered, then I also floured the pan. The pan has a rounded bottom which a lot of people had a lot of trouble with - I just sat the pan inside one of my oven-safe ramekins and had no problems!
The chocolate cake recipe says to bake at 175 for about 35 minutes, instead I reduced the temperature to 160C and baked for about 50 minutes. I also placed a pan of water in the bottom of the oven.
I found I needed to fill the pan nearly to the top - there was probably only about 1cm gap between the batter and the top of the pan but the cake didn't overflow, it rose just above the edge of the pan and was perfect for leveling once it had cooled.
I found it easiest to put the two halves together, ganache the entire ball and then cover each half in fondant seperately (I cut a small bit off the bottom of the ball so it had a flat base to sit on). I covered the white side first by placing the ganached ball upside down in a bowl and cutting off the fondant at the half way mark (that was easy enough to measure out since I knew the ball was 5" tall). I then cut a circle out where the cardboard base was on the ball (yes, initially I covered the cardboard base up - I found this worked easiest!). I then turned back the right way around and did the same with the red fondant. The seam where the two fondants met was covered by the black ribbon.


I did the Pokemon logo by printing it out on my computer, cutting each letter out and sticking to my fondant with shortening, then tracing out with my Xacto knife. I used the same technique for the Happy Birthday message on the bottom and the lightning bolts.

For the lightning bolts I used 22guage floral wire so that they looked like they were shooting out from the cake. I let the lightning bolts dry for a couple of days before I heated up the wires and inserted them into the lightning bolts.

I used a dowel+cardboard base support system so the weight of the Pokeball wouldnt squash the cake and covered a masonite cake board in fondant for the first time.

I was extremely happy with how this cake turned out and looking forward to a couple more orders I've received as a result!!

Monday, 3 June 2013

Baby Z's 1st Birthday Cake


So I thought I'd do a little post on the cake I made for Baby Z's birthday party. At first I was contemplating doing another fondant covered cake, maybe a ruffle cake like this:

Beautiful ruffle cake by It's A Cake Thing
But then I decided I wanted to make a smash cake to go along with the main birthday cake. I'm sure you've all seen the adorable photos of babies with their own little smash cakes, well I wanted to join the craze, BUT I had this crazy idea in my head of incorporating the smash cake into the main cake as the top tier. I hadn't really seen this before, most smash cakes I've seen are separate cakes next to the main cake.

Well this complicated the logistics for making the cake somewhat. In order to create the best effect and 'photo op', smash cakes should be covered just in buttercream, not fondant. If I was going to use the smash cake as the top tier then the entire cake really needed to be buttercream, otherwise it wouldn't look right (well, I couldn't think of two designs I wanted to do that would work together, there are a lot of other people out there who have successfully incorporated the two styles though!). Then I decided that I needed more practice doing buttercream covered cakes anyway and this would be a perfect opportunity.

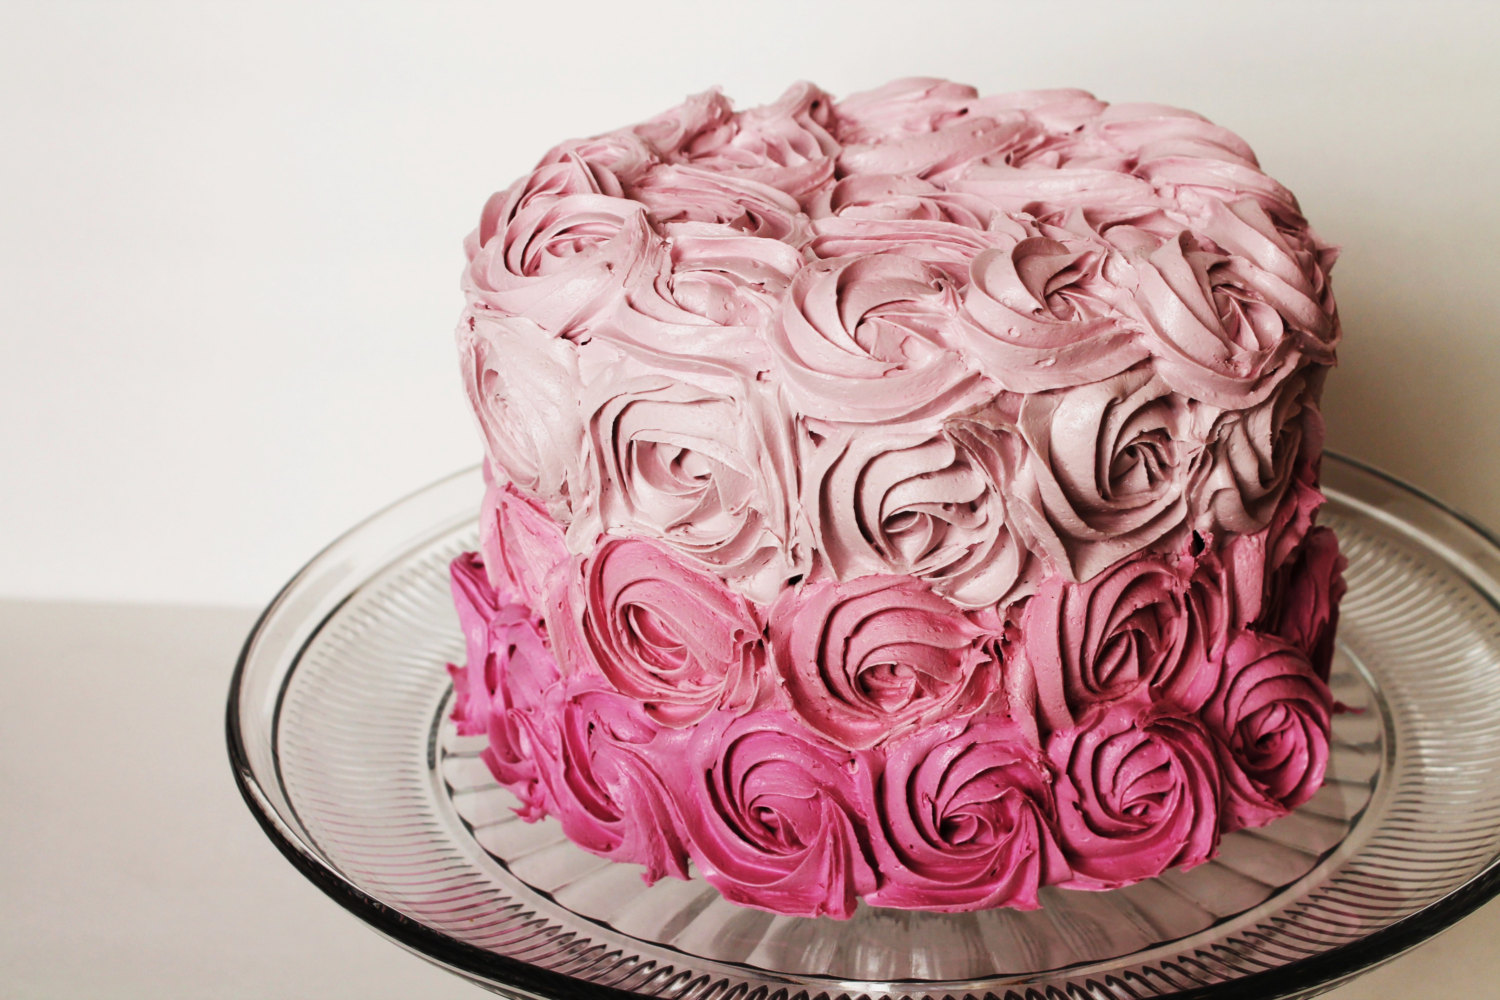
So then I was looking at these gorgeous rosette cakes:

This gorgeous Rosette cake is actually a fake cake for sale on Etsy!! Isn't that bizarre?! Lol

BUT then I didn't like any of the two tier examples I saw AND couldn't get other the fact that it looked much prettier in pink :(
So then I came across this beautiful pastel swirl cake from one of my bloggy idols, Sweetapolita, and fell in love...

Aww isn't it so sweet??!
I also used my fail-safe eggless chocolate cake for no reason other than the fact that I was craving chocolate and thought it would look pretty layered with the buttercream once smashed all over the floor hehe.

So there you have it, Baby Z's 1st Birthday cake:


Sunday, 17 March 2013

C.A.M. - March Cake

So the March cake is finally finished. I made a new baby themed cake to celebrate the birth of my new nephew, Makaio, decorated with fondant features such as mummy and baby turtle and mummy and baby owl toppers. I chose to include the owl and turtle in the design since my family has always passed down stories of our family ancestors taking on the shape of the owl and turtle to guard over us, so this cake is quite sentimental to me.


I used the Exclusively Foods chocolate mud cake recipe, layered with a milk chocolate ganache and Orchard brand fondant. I added texture to several of the pieces such as the grass, turtle shells and tree trunk using Fiskar's texture plates and added the stitching detail with the end of a toothpick (I used one of those fondant embossing tools for most of the large leaves but decided I preferred the look from the toothpick).

It's funny but looking at this photo I can't see anything I'm really unhappy with BUT when I was putting this cake together I was nearly in tears because I was convinced it was an utter failure! First of all, I had trouble putting the fondant on the cake. The cake is just over 6" tall and it was the first time I had ever covered such a tall cake. DH was also trying to 'help' me and getting in my way so I was getting quite frustrated with him!
I had a couple of little tears in the fondant which I was able to cover up with the decorations and DH moved the fondant as I was rolling it out over the cake and I ended up with not enough on that side! Needless to say I was pretty angry with him about that but I was able to cover it up again. I read something recently saying that the difference between a professional cake decorator and an amateur is that the professional knows how to cover up their mistakes. Well, if that's true then maybe I should open a business because you can't see most of my mistakes lol!!
I had made the decorations for the cake all in advance but unfortunately I hadn't stored the turtles properly so they had dried out a bit too much by the time I went to put them on the cake and I ended up breaking both of them in 1-2 spots :( I was able to join them back together to put on the cake but you can still see the spots where they broke.


No, my cake isn't crooked (trust me, I used my spirit level while making it lol!), but my cake stand is!
You can see quite easily in this picture that my fondant was far from perfect. Also, the grass border didn't line up properly under the tree trunk.

Despite all the problems I'm still pretty happy in the end. I don't know if I would be happy selling this cake to a customer without a huge discount, BUT the cake tasted lovely, it didn't fall apart, and most of it looks great. Just have to work more on covering the cake with fondant and not let my decorations dry out too much before putting on the cake.

Monday, 18 February 2013

C.A.M. - February Cake


For my February cake I wanted to make a cake for Valentines Day. I looked online for inspiration and found lots of cheesy heart shaped cakes covered in hearts and roses but they all basically looked like a greeting card spewed onto a cake. I'm not really into that style of cake at all so I really didn't want to make one like that. Then when I was browsing Cake Central, I came across this ruffled petal layer cake from ChrisJack1.

I love the design of this cake, and it looked simple enough to recreate. However, I wanted the cake to have more of a Valentines Day feel to it, so I decided to make the petals a wine/rose red shade. I also decided to make a rose to go on the side instead of the flower shown on ChrisJack1's cake.
Then I decided to jump on the ombre bandwagon and have the petals go lighter as they went up the cake. I also wanted to make the inside cakes ombre as well BUT while I was baking them I completely forgot and didn't add the food coloring lol!
For some reason I'm not a huge fan of fondant ribbon's on cake, they just don't have enough detail for my liking so I ended up using a satin ribbon instead.

DH ordered a white chocolate mud cake to go under the fondant and since I was making the cake for him for V-Day I gave in and hunted for a white chocolate mud cake recipe. I'd heard a lot about how good the mud cakes recipes are from Exclusively Food, so I searched their site for a white chocolate mud cake and found this one.


I made 4 layers of Exclusively Foods white chocolate mud cake but had a little bit of trouble with my oven. We recently got a new fan-forced oven but I feel as though it runs about 10 degrees hotter than it should! I've found that I always need to reduce the temperature by at least 10 degrees and bake items for the minimum suggested cooking time. I know that you normally reduce the temperature for fan forced ovens anyway BUT I still have to reduce it from the suggested temperatures for fan forced ovens??? Very frustrating!
The recipe stated to bake at 160 (145 for a fan-forced oven) for 1 hour 10 minutes to 1 hour 20 minutes. I reduced my oven to 135 and put the first two layers in for 1 hour 10 minutes and they still came out quite dark! Luckily the inside seemed fine so I just cut off the dark bits when torting the layers. I'm going to buy an oven thermometer so I can keep a better eye on the temp of my oven :(

I also made a white chocolate sour cream ganache, using the Exclusively Foods recipe (recipe for the ganache is under the recipe for the white choc mud cake) and used that to fill the layers and dirty ice the cake.

I used Orchard brand white fondant to cover the cake and Bakels Pettinice pre-made red fondant to make the petals. I was very apprehensive about getting the dark red colors; I did a lot of Googling to find out how to achieve it and most people seemed to agree that it was extremely difficult to get that dark wine shade. Putting together a few of the most common suggestions I ended up having no trouble achieving the right shades.

You'll have to pardon the graininess of these photos - I had my ISO set way too high! Oops!

To get the dark shades of red I added Americolor chocolate brown gel coloring and a touch of Americolor super black to get the darkest shade. The black gave it that real dark, burgundy shade that I was hoping for. To get the lightest shade of red I mixed white fondant with the red. I didn't actually end up using the super red gel coloring but had it on standby just in case.

I probably should have made the second lightest color slightly darker and probably should have mixed a little more white fondant through the lightest shade BUT I was lazy and gave up lol!

I used the Pettinice red fondant without any changes to make the rose for the cake.
The cake turned out perfectly, it stayed nice and moist under the fondant, the sour cream ganache helped cut through the sweetness a bit (although it was still super sweet - thinking of maybe cutting back on the sugar a bit next time!), I had NO issues with bulging this time (YAY!! I think it was probably because I used only ganache for filling and dirty icing and stuck to a mud cake which is quite dense), and I had no problems with covering the cake with fondant.


Criticisms:
The ribbon is crooked. I know. Just pretend you don't notice it and we'll all be happy. I also forgot to defrost the royal icing so I could 'glue' the ribbon and rose on, so I ended up having to use some pretty quilting pins I'd bought a few days ago. Since we were eating it at home I didn't really mind but I would NOT suggest doing this if you were giving it to others!!
The cake was really sweet. As I said, I think I'll cut down on the sugar next time.
The cake wasn't really high enough for all 4 layers of petals, which is why I placed the bottom layer so they lay on the cake stand. I really wanted to include all 4 layers for the ombre effect and still keep the ribbon, this was the only way I could see to fit them all on.
It would have been a bit prettier if I'd lifted the petals a bit before they had a chance to dry. By the time I remembered to do this they had already dried too hard.
I probably should have made the second lightest red petals slightly darker and the lightest ones slightly lighter. The two shades are too similar for my liking.


All in all I'm actually really really happy with how this cake turned out. Even with the few criticisms I listed above I wouldn't hesitate to make this again for a customer.

For next months cake I'm thinking of doing a new baby cake in honor of my baby nephew who is due on the 21st of March. Stay tuned to see how I go!!

Sunday, 20 January 2013

Cake-A-Month - Finished January Cake

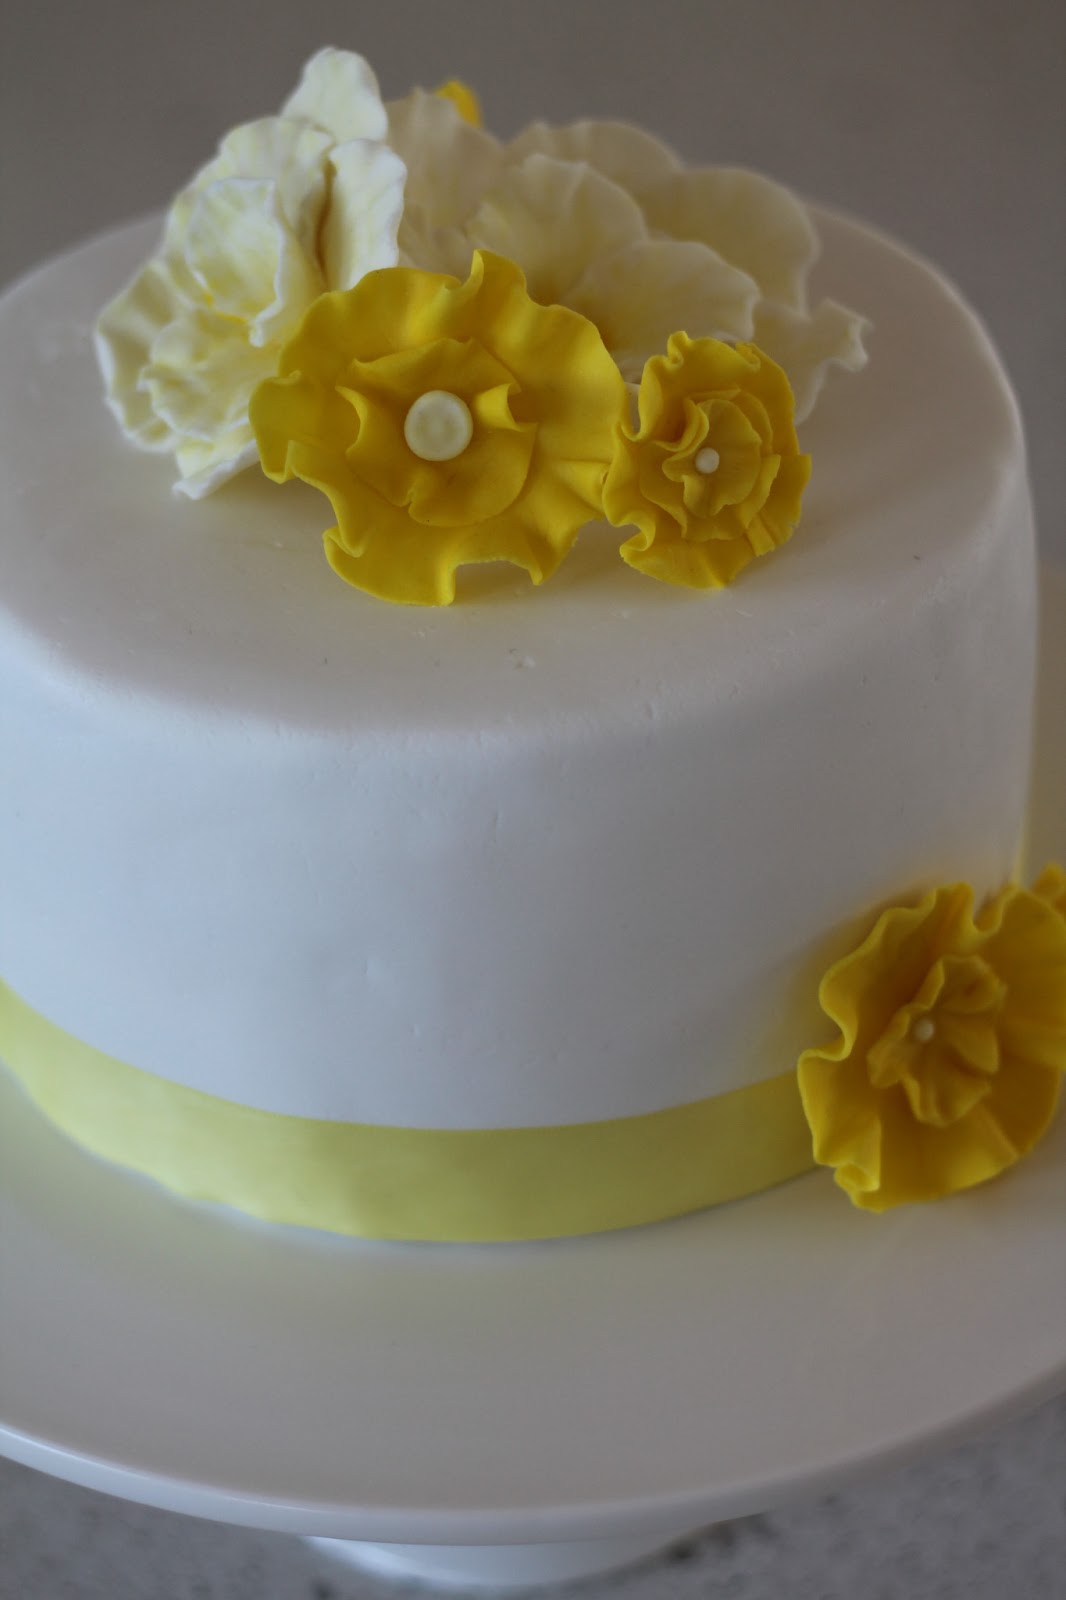
So here's the final reveal of the January cake: a coconut cake layered with lemon curd and frosted with lemon Swiss Meringue Butter Cream, covered in fondant and decorated with gumpaste flowers.


I was actually really surprised at how easy it was to do the fondant this time. I did a few little things differently this time, not exactly sure which thing made the biggest change. For starters I used a different brand of fondant this time. I was going to buy the Satin Ice fondant like I used last time, but my regular supplier was out of the Satin Ice and sent me Orchard brand fondant instead. I was pretty annoyed about this and worried about using the different brand, but the fondant was extremely pliable and soft, didn't get sticky and was very easy to smooth. With last months cake I had colored the fondant with gel food coloring, whereas this time I left it white, so I don't know what difference that made to the workability of the fondant (is workability a word?? Well it is now anyway!)
 

Last time, I used powdered sugar to stop the fondant from sticking, and then started using shortening when the fondant began cracking. This time however, I only used shortening and had some powdered sugar on standby in case the fondant got too sticky, which it didn't!

And I think the biggest difference was the weather! You may recall me saying that the weather when I was doing the Christmas cake was stinking hot, well I was extremely lucky this time around and the one day I was working with the fondant the weather dropped by like, 10 degrees!

So you can see that after I made two of the rose-style flowers I gave up and made some simple ruffled circle flowers to go with the cake. I got too frustrated with the rose style ones, and they took a lot of time (which I was very short of!) and patience (which I also lack lol!) to make, so I decided to start off testing my skill by doing the simpler flowers for the first couple of cakes before moving onto proper roses. Next time around I'll also color the gumpaste first rather than painting the final product and use luster powder to add dimension.

You can see that the fondant still isn't perfectly smooth, but I'm definitely getting better at it! Practice makes perfect right?

And it was way easy to put the ribbon border on, the hardest thing was lining it up properly so the bottom of the cake was entirely hidden. I don't think you can really see it in the photos but there are a couple of spots where about 3-4mm of cake are visible at the bottom of the border.

I would definitely make sure that next time I make the cake on a cake board, I didn't use one this time because I didn't think it would be necessary, but moving the cake around was a real pain in the butt. I couldn't make the cake on the cake stand because the cake stand wouldn't fit in my fridge so used a regular plate, but it was difficult to cover the cake in fondant on the plate because of the edges!
I have a really handy pizza lifter that I use for lifting and moving my cake layers, but I still had a bit of trouble moving it at the end, so I might buy some of those cheap bulk cake boards off eBay for next time.

So, I'm really, really happy with how the cake turned out and I'm now starting to think about next months cake - maybe a Valentines Day themed cake?? :)

Oh btw, Happy Birthday to my wonderful dear husband, who without a doubt, is the best thing to have ever happened to me - especially since he's given me two beautiful, happy boys!!! I love my family :)

Monday, 31 December 2012

Cake-A-Month - January - Post 1


I'm really feeling over sickeningly sweet chocolate cakes after the Christmas cake, and ever since we came back from our holiday to Hawaii I've been obsessed with all things coconut. Then I saw this cake from The Cake Blog and I fell in love:

Isn't it just so fresh and summery looking?
At first I was going to do a basic single tier version of the same cake - with different flavors inside of course! - but then I decided against it because I've made things with fondant similar to the lemon slices before and there are so many other techniques I want to try out. Then I came across this flower tutorial from Bronnie Bakes and this picture tutorial on Pinterest (sorry, I don't know who to credit with this picture, but have included the link that's attached from Pinterest - if anyone knows who to credit the tutorial to, please let me know!).

Fondant flower tutorial from unknown source - sorry!

Fondant flower tutorial from Bronnie Bakes


So what I've decided to do is use Beyond Buttercream's white cake recipe to make a single tier coconut cake, torted into 4 layers and filled with a lemon curd, and frosted with a lemon version of Sweetapolita's Swiss Meringue Buttercream, covered in fondant with a yellow satin ribbon border and 2-3 yellow fondant flowers. Phew! :)

Techniques I want to learn with this cake:
  • A proper white cake recipe which can hopefully be the basis for many more cakes in the future.
  • Making Swiss Meringue Buttercream
  • Covering the cake with fondant
  • Fondant flowers
  • Using a ribbon border
  • Getting a perfectly smooth buttercream frosted cake
 It's my 25th birthday next month, as well as my husbands 25th birthday - we're 2 days apart - so hopefully I'll have a pretty cake to serve at our birthday dinner :)

Cake-A-Month - December - Post 5


This will be the last installment about the Christmas cake I made. I wanted to go over some of the problems I had and mistakes I made and things I'll try to change around next time.

Problems I had:
  • Fondant. 'Nuff said.
  • Sides bulging
  • Cake was overpoweringly sweet
  • Cake was a bit dry

At the end of the last post I had a photo of my finished cake. Well that photo is a bit misleading. That's what it looked like when I was finished decorating it and for that day but by the next day the sides had started to bulge. I thought that I was safe from that happening because I had used a dam around the filling when torting the cake but I don't think that I had used a stiff enough frosting for the dam. I thought I simply had to use the same frosting and that the act of putting the dam there would be enough, but I should have made the frosting for the dam much stiffer. Next time around I'll trythe stiffer frosting, as well as less frosting since it was so sweet!

Bulging sides


The cake was also very very sweet. Not so much the cake itself, but with the frosting between each layer, ganache over the top and then fondant, it was very rich and sickening. Next time I'm going to try making a swiss meringue buttercream frosting, I've heard terrific things about it and it isn't meant to be anywhere near as sweet as American buttercream. It's meant to be a bit difficult to make but with Sweetapolita's instructions I'm going to try and attempt it anyway. Note: If you haven't looked at her blog before, I seriously recommend it!! I'm always lurking on her blog drooling over her gorgeous creations! That ruffle cake is to die for!
I'm also going to try putting less frosting between each of the layers next time. We'll see how it goes next month...
The texture of the cake was a little too dry as well. Normally this cake is really really moist, it's one of the things I love about the recipe. There are a couple of factors that I think may have made the cake so dry. For starters I wasn't really sure if this was the right type of cake to put under fondant, I'm still thinking that maybe it was too soft and may have added to the bulging problem. I don't think that going in and out of the fridge and freezer really helped and I think that the hot weather may have also contributed. I really have no idea but there are some things I'm going to do next time to make sure this doesn't happen again:
I'm going to try out a recipe for a white cake that many bakers on Cake Central recommend from Beyond Buttercream. I don't really have a go-to recipe for a white cake so I'd like to try this one and see how it works for me.
Next time I'm not going to constantly take the cake in and out of the fridge or freezer, I'll try to organize it a bit better so it gets defrosted only 1-2 days before it's going to be served. I'll also brush each layer with some sugar water when stacking, supposedly that's supposed to help lock in moisture.
I had left it out at room temperature the last night because supposedly you're not supposed to put fondant cakes in the fridge since it makes the fondant sweat but I've read from lots of people that do it anyway without any problems so I may try to do it anyway next time so the heat doesn't dry out the cake.
I haven't given up with fondant, I'm determined to get it right. I think my biggest issue was with the humidity and heat, but if I want to continue doing cake decorating in the future then I'm going to have to learn to deal with the Aussie summer weather! My house is relatively cool though and I hadn't bothered turning the fans on that day, next time I'll have the fans going in the kitchen.

Overall I'm pretty happy with month 1, I think that I did a really good job considering it was my first time tackling fondant and the weather conditions weren't in my favor at all. I'm looking forward to next months cake. Its my husband's and my 25th birthdays next month (our birthdays are 2 days apart) so I might do a joint birthday cake for us. I'm thinking a coconut cake with lemon curd filling and lemon SMBC frosting, yummo!

Sunday, 30 December 2012

Cake-A-Month - December - Post 4


Okay, onto the part that I was dreading excited about trying very very nervous about: the fondant! I had made my own marshmallow fondant for my sons 1st birthday cake but I really didn't know what I was doing at the time. The recipe said to mix icing sugar (powdered sugar to those in the states) through the melted marshmallows until it came together at the right dough-like texture for fondant. But I'd never worked with fondant before so I had no idea what the right texture was, so I just made a guess and it worked out perfectly fine for the time since I was only using it to sculpt bugs but I don't think that method would work very well if I were trying to cover a cake in fondant so I decided this time around to buy some of the pre-made stuff to get a feel for how it's supposed to feel to work with (not Wilton brand though! I may be new at this but I know better than to buy Wilton's pre-made fondant lol!).
My very first attempt at cake decorating. A bug themed cake for my sons 1st birthday.
 After reading up a bit on it I decided to use the Satin Ice brand. It's taste is meant to be quite nice and although it's supposedly more difficult to work with especially compared to Wilton I figured I may as well use the real stuff rather than wasting my time and money on Wilton fondant. It cost a small fortune though, it wasn't readily available in any of the nearby stores here in Canberra so I had to buy it online. Cost me $25 including postage :O
It was terrible weather when I was working with the fondant, it was hot and muggy and very very humid. Needless to say I had several problems. First I think I was working with the fondant too much, I kept rolling it out using powdered sugar to keep it from sticking and to help it not be so soft and sticky (I now know that powdered sugar then makes it very dry and promotes cracking), but then it would get too dry and I'd use shortening, only to have it get too soft in the warm weather. I'd roll it out but it would tear and I'd roll it back into a ball to roll out again. Long story short, I should have just left it alone instead of constantly adding this, then adding that to fix the problem this caused...
I also didn't think I would have enough fondant. The 2 pound tub I bought was supposed to be enough to cover a 4" high 10" wide cake, my cake was 9" and about 3.5" high so I figured it would be enough but when rolling it out I ended up having to roll it really thin to have enough to cover the cake. The thinner the fondant the more prone to tearing and more difficult to work with so I wasn't off to a great start.
Finally after a lot of swearing and help from my helpful hubby I got a nice large circle of fondant about 20" across, enough to cover the cake with an inch spare either side. I used my rolling pin lift it and cover it over the cake and quickly smoothed down the top and tops of the sides. This is where the second lot of trouble started.

The fondant tore. In several places actually. It was just too heavy and thin and couldn't cope with the weight and ripped. Then all these miniscule cracks started appearing at the top edge in the fondant. I quickly worked on smoothing and attaching the fondant to the rest of the cake, quickly cut away the excess and tried to work out how to repair the tears. I'd read about a lot of people having luck with using shortening to fix the cracks so I started rubbing shortening into the miniscule cracks to soften the fondant up enough to close the cracks. Luckily it worked pretty well. Then my husband gave me a hand and discovered a way to fix the large tears. He would get a bit of fondant, soften it up with shortening and sorta 'patch' it over the whole then use the shortening to smear the edges to make it look seamless. It actually worked pretty well and we managed to repair all the cracks. By this point the fondant was getting too soft from the humidity so we decided to put it away in the fridge for a few hours to harden it up.

A few hours later we brought the cake out and used shortening to finish smoothing the miniscule cracks and edges of the patch-jobs and used the Wilton fondant smoothing paddle to finish the smoothing job. Despite all the problems I had, the end result was actually pretty good and I was very proud of my our work.

Despite the problems I had I reckon it looks pretty damn sexy!!
 I decided to leave the cake sitting out overnight under a fan to help dry it out because even after being in the fridge the fondant was still pretty soft and...squidgy :/

The next morning I attached the snowflakes with dabs of royal icing and took it to the in-laws for Christmas Eve dinner :)


Pretty happy with the results!
Look at all those pretty layers!


Saturday, 29 December 2012

Cake-A-Month - December - Post 3


In the last post I made my cakes and layered them with cherry brandy buttercream frosting. I forgot to mention that I wrapped the cake up and placed it back in the freezer after this. The next step was to frost the cake with ganache and I'd read that this was easier to do with a frozen cake.

I made my ganache in the microwave using 2 parts of milk chocolate melts to 1 part of cream. When I was trying to work out what type of cream to use the articles I had read said to use whichever type of cream you use to make whipped cream, which here in Australia is usually thickened cream so that's what I grabbed in the store. The morning before I went to make the ganache though I read a bit more and discovered that thickened cream wasn't recommended because they add gelatin to it and the carton of pure cream was preferred. I crossed my fingers and used the thickened cream anyway and fortunately it worked perfectly.
I ended up using the ganache recipe instructions which were on the back of the packet of chocolate melts, which was the microwave method. Worked brilliantly and the ganache was to die for!! I put it in the fridge overnight to harden it up so it was a frosting consistency to spread on the cake - otherwise the ganache is too runny and ends up being a pouring version.

Mmmm, all gone now!
So I frosted the frozen cake using an angled 10" spatula, and held the metal blade under hot water for a few moments to heat it up, then used that to smooth the frosting. I was able to get pretty sharp edges and smooth sides using the ganache, very very impressed with the results of using ganache instead of buttercream for this stage!

This ganache was so damn good, I was tempted to roll around in a bowl of it!!


Once I had covered the cake in ganache I put it back in the freezer and got started on making the decorations for the cake. Even though I live in Australia and Christmas is essentially in the middle of our scorching hot summer I wanted to decorate the cake with snowflakes to keep with the Christmas theme.
I'd been looking at Sweetopia's blog and her beautiful sugar cookies and was inspired. Even though I was making a cake and not cookies, I decided to take that inspiration and pipe some delicate snowflakes onto wax paper with her royal icing recipe and transfer them to the cake rather than piping directly onto the cake. I'm not a very good artist and don't trust myself to do designs free-hand so printed off some basic snowflake designs to place under the wax paper

Pretty little snowflakes
 You can just see the printout I used at the top of the picture. I got most of the printouts from Knuckle Salad, although I also used another image from one of Betty Crocker's recipe's.

It took the better part of an entire day to pipe out the snowflakes, but they turned out so delicate and beautiful, it was definitely worth the aching hand!! I left them on the wax paper overnight to set and harden then in the morning used my angled cake knife to gently lift them from the paper as I pulled the wax paper down over the edge of the table like in the photo above. That way the edges started to peel off the paper by themselves before I eased the knife under.

I had piped out about twice as many snowflakes as I thought I would need because I was expecting most of them to break as I tried to lift them off the wax paper. I was very surprised to find that I only broke about 3 out of the entire batch! And one of them was because I dropped it in shock that it had come off so easily lol!

I stored them in an airtight Tupperware container till I was ready for the decorating stage.

Friday, 28 December 2012

Cake-A-Month - December - Post 2


For my Christmas cake I used my trusty chocolate cake from scratch recipe. I found this recipe about 5 years ago when looking for an eggless cake recipe for my mom who is a lacto-vegetarian (eats dairy products but not egg or any other form of meat including seafood). I tested this recipe before making it for her and was stunned to find that it actually tasted pretty darn good - REALLY good!! AND it doesn't have dairy in it either!!! And to top it off, its made completely of pantry non-perishable staples that I always have in my kitchen, yay! Oh and did I mention how easy it is??? It's essentially a box cake recipe, it's so darn easy to make. I never bother with sifting and rarely measure my ingredients too carefully lol but I've never had this recipe fail on me, and I am ALWAYS asked for the recipe - even by my mother-in-law who is well-known for her baking talents :D I'm sure by now you're probably tearing your hair out wondering when the hell I'm going to get around to telling you the recipe...well I'll get to it. Eventually. At the end of this post.... (and the suspense builds...)

So, back to the Christmas cake, I baked four thin layers, and leveled them off. Normally I don't bother levelling my cakes, but when I try to do a fancy-ish cake in the past I've always cut them with a bread knife and eye-balled it. Doesn't usually go too well but I rarely bother so didn't really think much of it. But for my sons 1st birthday I bought the Wilton's cake leveller since I decided that for the price if it worked it would be worth it. Well fyi, it doesn't. It sucked, the wire wasn't stretched taut enough across the frame so when I went to use it it just stretched and went wherever the hell it wanted. I had these visions of it simply gliding through the cake, but it wasn't even sharp, I ended up having to saw it as though I was using a knife anyway. I think I got about halfway through the cake before giving up. Goddamn it.

But then, I read about this technique of measuring the height you want with a ruler and inserting toothpicks around the cake every couple of inches, then using a bread knife to score a couple of millimeters deep around the cake before cutting all the way through with the bread knife while keeping even with the toothpicks. I think I even watched a video of it on youtube that made it look so easy so I decided to try it for the Christmas cake. Well, whaddya know! It actually works!!! Didn't take too long to do at all, didn't require buying any special gimmicks that don't work, and was easy and straightforward. I highly recommend using this technique if you're like me and have crooked eyeballs lol!

This isn't the same brand as the one I used, but it does look exactly the same.

So then after freezing my cake layers, double wrapped in glad wrap (saran wrap for the rest of you guys not located in Oz!) I made up a batch of cherry brandy frosting. I tend to freeze my cakes because I find that the cake ends up really nice and moist after being frozen, never noticed any negative difference in flavor (only the moisture and that can hardly be described as negative!) and hell, makes it easy!

Tada! Mmmm looks good so far!
I made the cherry brandy frosting by mixing up a batch of standard buttercream frosting (I think it's often referred to online as American buttercream - even though we make it here in Australia too lol - and is made mostly from creaming powdered sugar with butter) then adding about 1/4C of cherry brandy and about half a cup of chopped up red glace cherries. I would have used maraschino cherries but they're very very difficult to find here in Australia and I had no luck searching :(
I'm not going to add the recipe for the buttercream frosting because I didn't end up liking the recipe I used very much, it was sickeningly sweet and nearly made the cake unbearable.

When torting the cake I piped a dam of frosting around the edge of the layer before covering in frosting. Supposedly this helps prevent issues of the frosting being squashed out from between the layers and causing the fondant to bulge. In another post I'll explain where I went wrong with this :(

My No-Fail Egg-Free, Dairy-Free but Yummo Chocolate Cake

 1.5 cups plain flour
1 cup sugar
4 tablespoons cocoa
1 teaspoon bicarb soda
1/2 teaspoon salt
1 cup water
1/3 cup vegetable oil (I've also used olive oil and canola oil if I'm out of vegetable oil with no discernible difference)
2 tablespoons white vinegar
2 teaspoons vanilla extract

Preheat oven to 180 Celsius, or 350 Fahrenheit
Mix all the dry ingredients.
Mix all the wet ingredients.
Add wet to dry and mix till thoroughly incorporated. Batter will be fairly runny for a cake batter - this is okay!
Pour into greased cake tin (I've used all sorts of different shapes and sizes, best would have to be an 8" round) and bake for 30-40 minutes.
Let cool for ten minutes before removing from the tin to cool completely.

**Note: A lot of people are very surprised about using vinegar in this recipe. Don't worry, I was the same when I first read the recipe, but somehow or other it actually works! The best I've been able to figure from searching online is that the vinegar somehow compensates for the lack of eggs in the recipe. Not sure how or why, I'm no scientist, I just enjoy eating the damn things!!

Thursday, 27 December 2012

Cake-A-Month - December - Post 1


So for the first month I decided to make a Christmas themed cake - of course! - and I really wanted to learn how to work with fondant, specifically how to cover a cake in fondant. I made my own marshmallow fondant for my sons 1st birthday cake and used it to sculpt a bunch of bugs and leaves to decorate a buttercream frosted cake. I didn't feel confident enough at that point to try covering the cake in fondant (afterall, it was the first cake from scratch I had ever made!), and it turned out really well and received a lot of compliments.
So for my Christmas cake I decided to make a 4 layer chocolate cake with cherry frosting and decorated with snowflakes.

The techniques I wanted to practice with this cake were:
Making a layered cake.
Making my own buttercream frosting (in the past I just used the canned Betty Crocker icing lol!)
Covering a cake in fondant
Some basic piping

After a bit of research I also decided to cover the cake in chocolate ganache instead of more buttercream since it would supposedly give the cake sharper edges and smoother sides once covered in fondant. I used my own trusty chocolate cake recipe that I've been making for years now (tastes sooo good, everyone loves it and asks for the recipe, it's extremely easy to make and uses only staples I always have on hand AND - you'd never guess it BUT - it's egg-free and dairy-free!!! I'll post the recipe later lol), used Sweetopia's royal icing recipe and made a basic ganache.


I'll go through the process of making this cake over the next few posts.